

In this article we will take a glimpse into the future of account abstraction where web3 can offer walletless, passwordless authentication to web applications.
I’ll be connecting a Stellar Soroban smart contract to a web3 frontend and verifying signatures from biometrics on your phone. Welcome to the future.
- How Do WebAuthn and Passkeys Work
- Creating a Web3 Frontend for Biometric Signatures
- Authenticating Signatures in Soroban Contracts
- Account Abstraction & The Future of Web3
The full source code used in this tutorial is available on Github at: https://github.com/jamesbachini/WebAuthn-Passkey

How Do WebAuthn and Passkeys Work
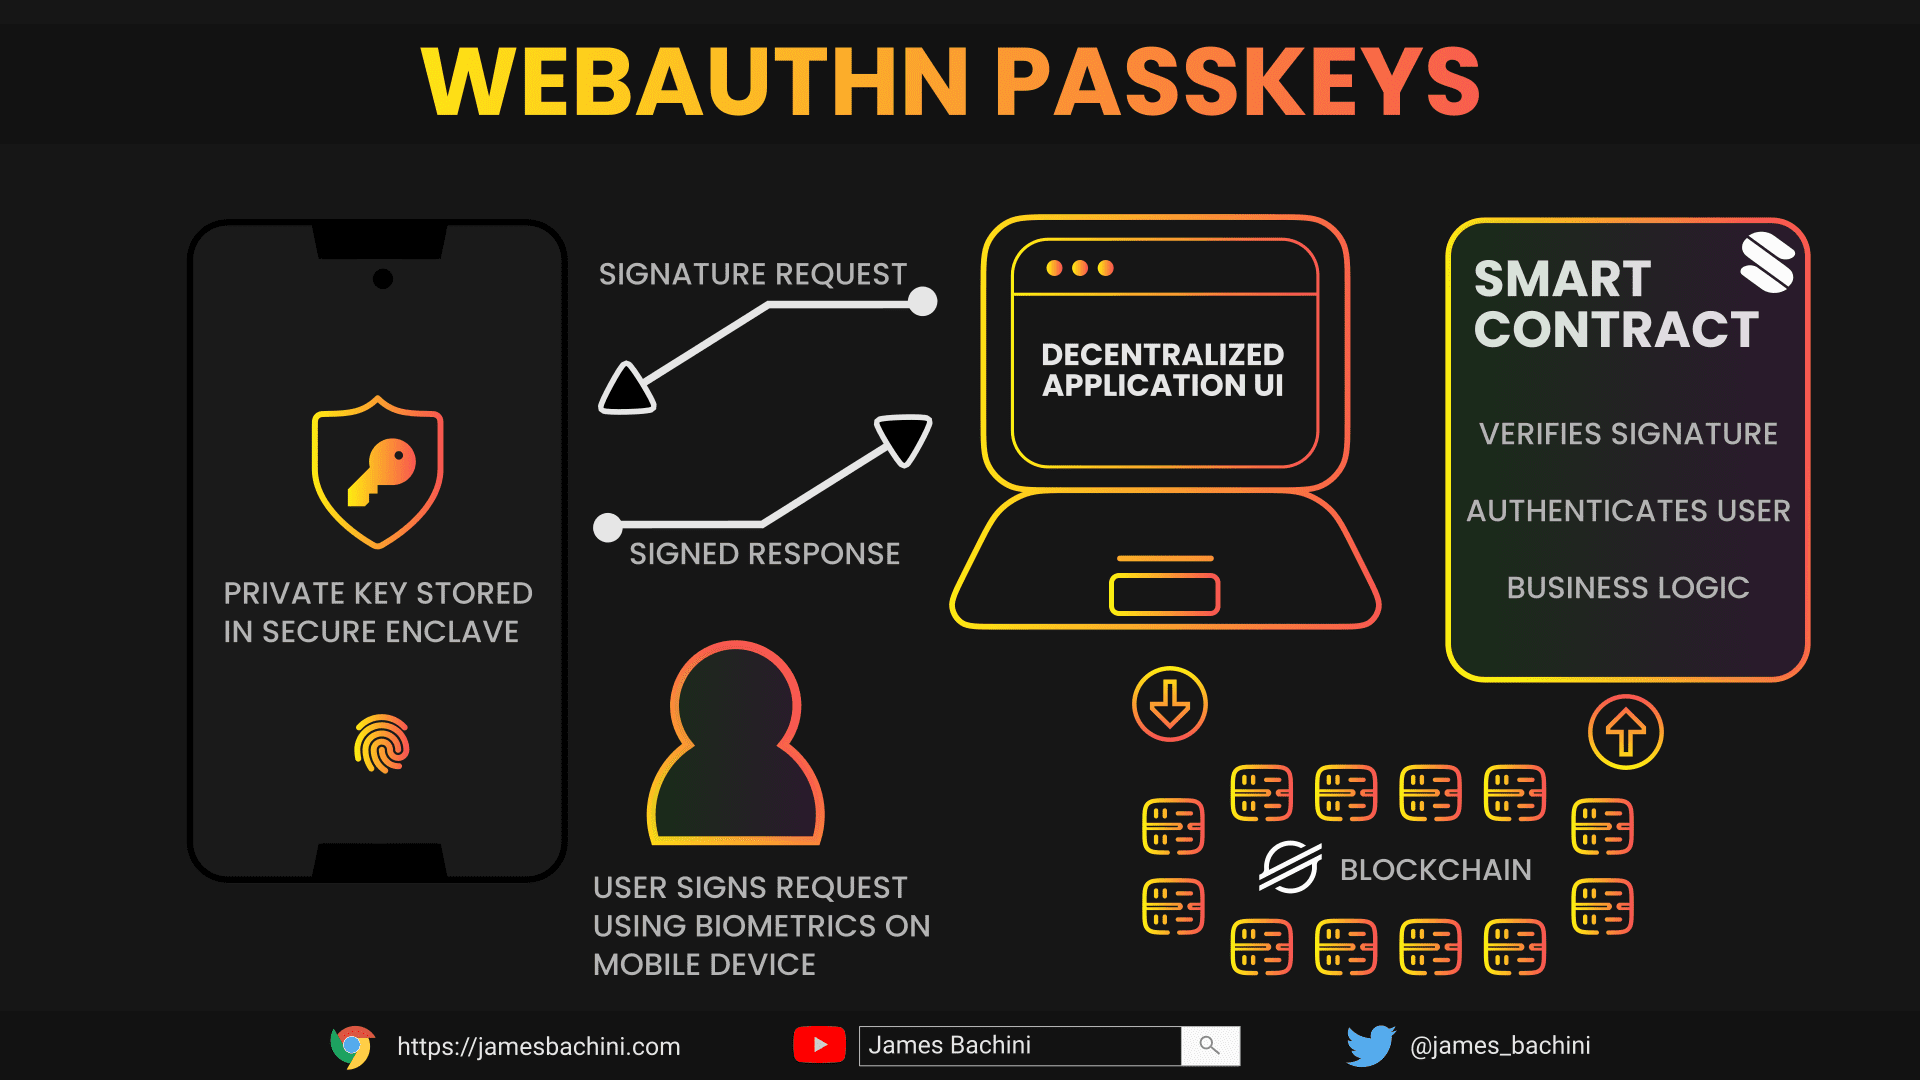
WebAuthn (Web Authentication) is a web standard published by the World Wide Web Consortium and adopted by all the big tech firms. It provides an API that allows web applications to use cryptography instead of passwords for user authentication.
Passkeys are a user friendly implementation of WebAuthn, enabling passwordless authentication using biometrics like fingerprints or facial recognition from your smartphone to create a cryptographic signature.
Key Benefits
- Enhanced Security Eliminates the need for passwords, reducing the risk of your blessed users being hacked because they thought Passw0rd! was a good password or clicked on an ad leading to a phishing attack to steal credentials.
- User Convenience Users can authenticate using biometrics or secure enclave based credentials. This means they wont forget which of their 2 passwords they use for every was used for your site.
- Phishing Resistance Authentication is tied to the origin, this makes phishing attacks much more difficult to execute and unlikely.
Creating a Web3 Frontend for Biometric Signatures
In this section, we’ll create a simple React application that interacts with a Stellar Soroban smart contract using biometric signatures.
Prerequisites
- Node.js and npm installed.
- Basic understanding of React and JavaScript.
Setting Up A React App
Create a new React application:
npm install create-react-app
npx create-react-app webauthn-passkey
cd webauthn-passkey
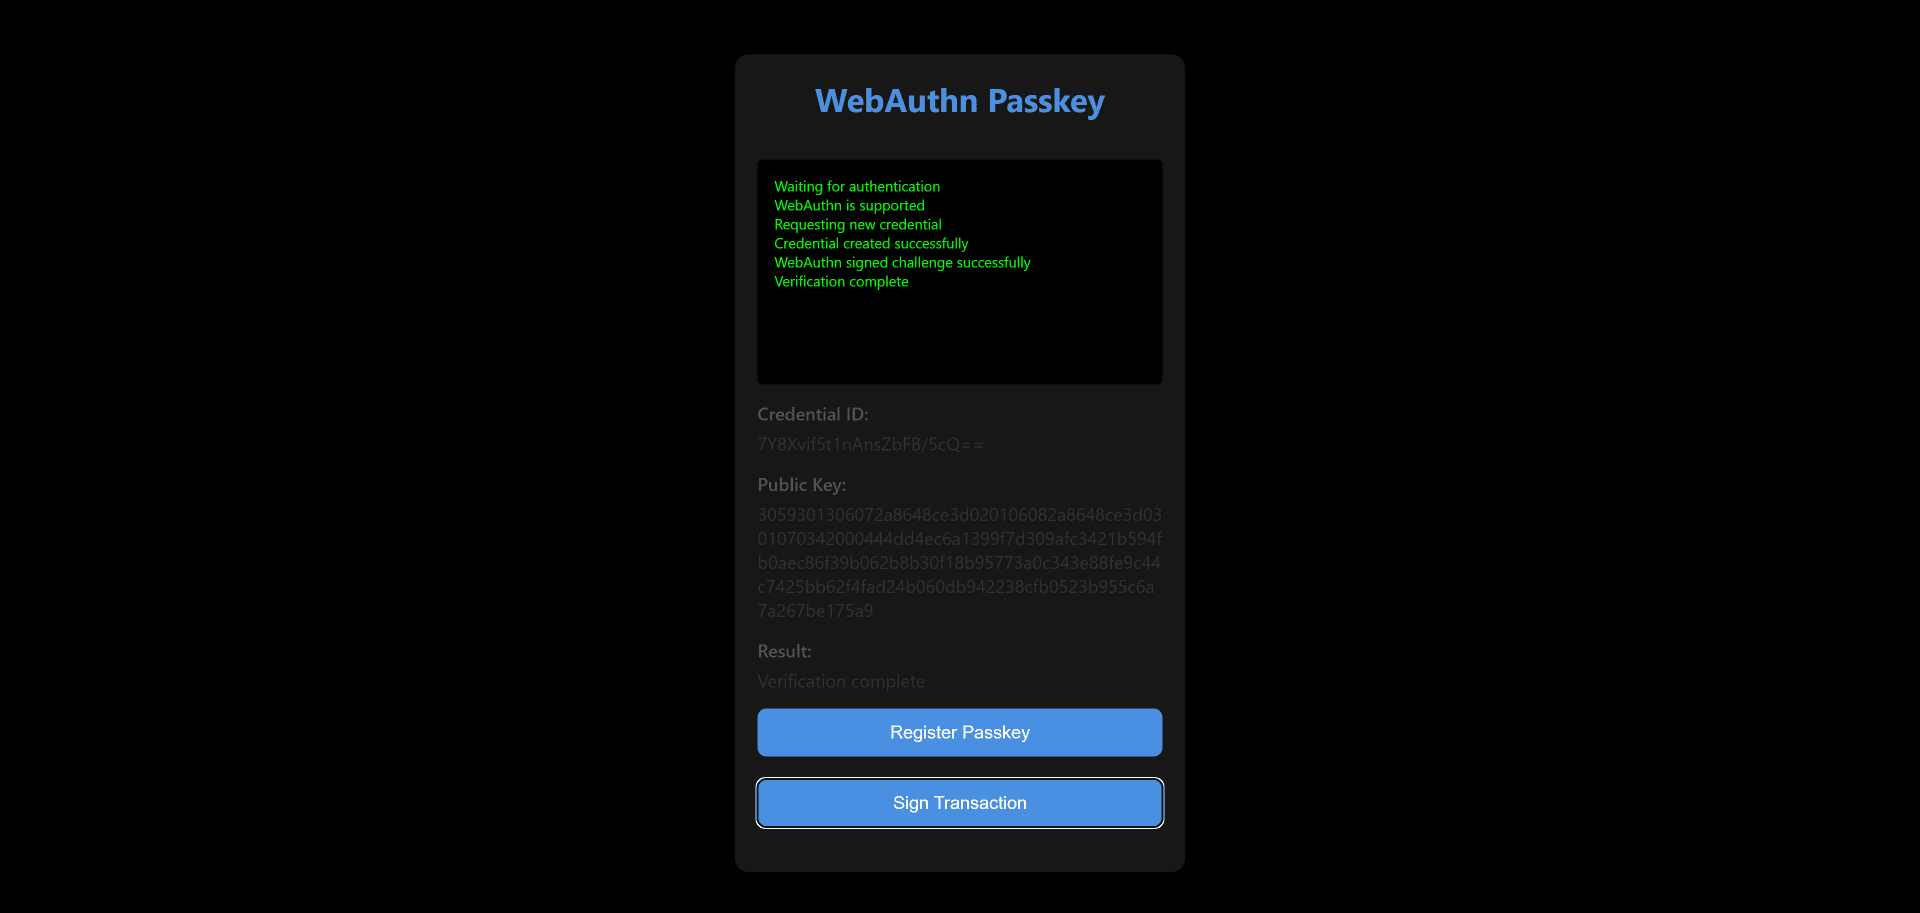
npm startWhen you run npm start it will open up a developer environment with live updates for the react app in your web browser. You can now edit the webauthn-passkey/App.js and App.css or fork the code directly from the repository here:
https://github.com/jamesbachini/WebAuthn-Passkey
Let’s take a look at some of the key functions in this code:
const publicKeyCredential = await navigator.credentials.create({
  publicKey: {
    challenge: new Uint8Array(32), // Generate securely
    rp: {
      name: "WebAuthn PassKey",
      id: window.location.hostname,
    },
    user: {
      id: new Uint8Array(16), // Unique user identifier
      name: "Stellar User",
      displayName: "WebAuthn User",
    },
    pubKeyCredParams: [
      { type: "public-key", alg: -7 },
      { type: "public-key", alg: -257 },
    ],
    authenticatorSelection: {
      authenticatorAttachment: "cross-platform",
      userVerification: "required",
    },
    timeout: 60000,
    attestation: "none",
  },
});
const credId = publicKeyCredential.id;
const publicKeyBytes = new Uint8Array(publicKeyCredential.response.getPublicKey());
This is the key code from the registerWebAuthn function which sets up a new cross-platform passkey.
The challenge is a randomly generated value, which must be securely created to prevent replay attacks. In this example, it is a simple Uint8Array with 32 bytes, but in practice, it should be securely generated on the server side and passed to the client.
The rp object defines the “relying party,” which is the entity requesting authentication. The name field identifies the service (e.g., “WebAuthn PassKey”), and the id is set to the domain of the website (window.location.hostname), ensuring the credential is bound to the current site.
The user object represents the user registering the credential. The id is a Uint8Array representing the unique user identifier, while name and displayName are strings used to describe the user. These identifiers will later be used to map the credential to the correct user.
The pubKeyCredParams field lists acceptable cryptographic algorithms for the key pair that will be created. In this example, two algorithms are specified: ECDSA with SHA-256 (alg: -7) and RS256 (alg: -257), allowing flexibility in the type of public key generated.
This specifies constraints for the authenticator. In this case, authenticatorAttachment is set to "cross-platform", indicating the use of an external authenticator (like a security key or mobile device), while userVerification is "required", meaning the user must verify themselves through a biometric method or a PIN.
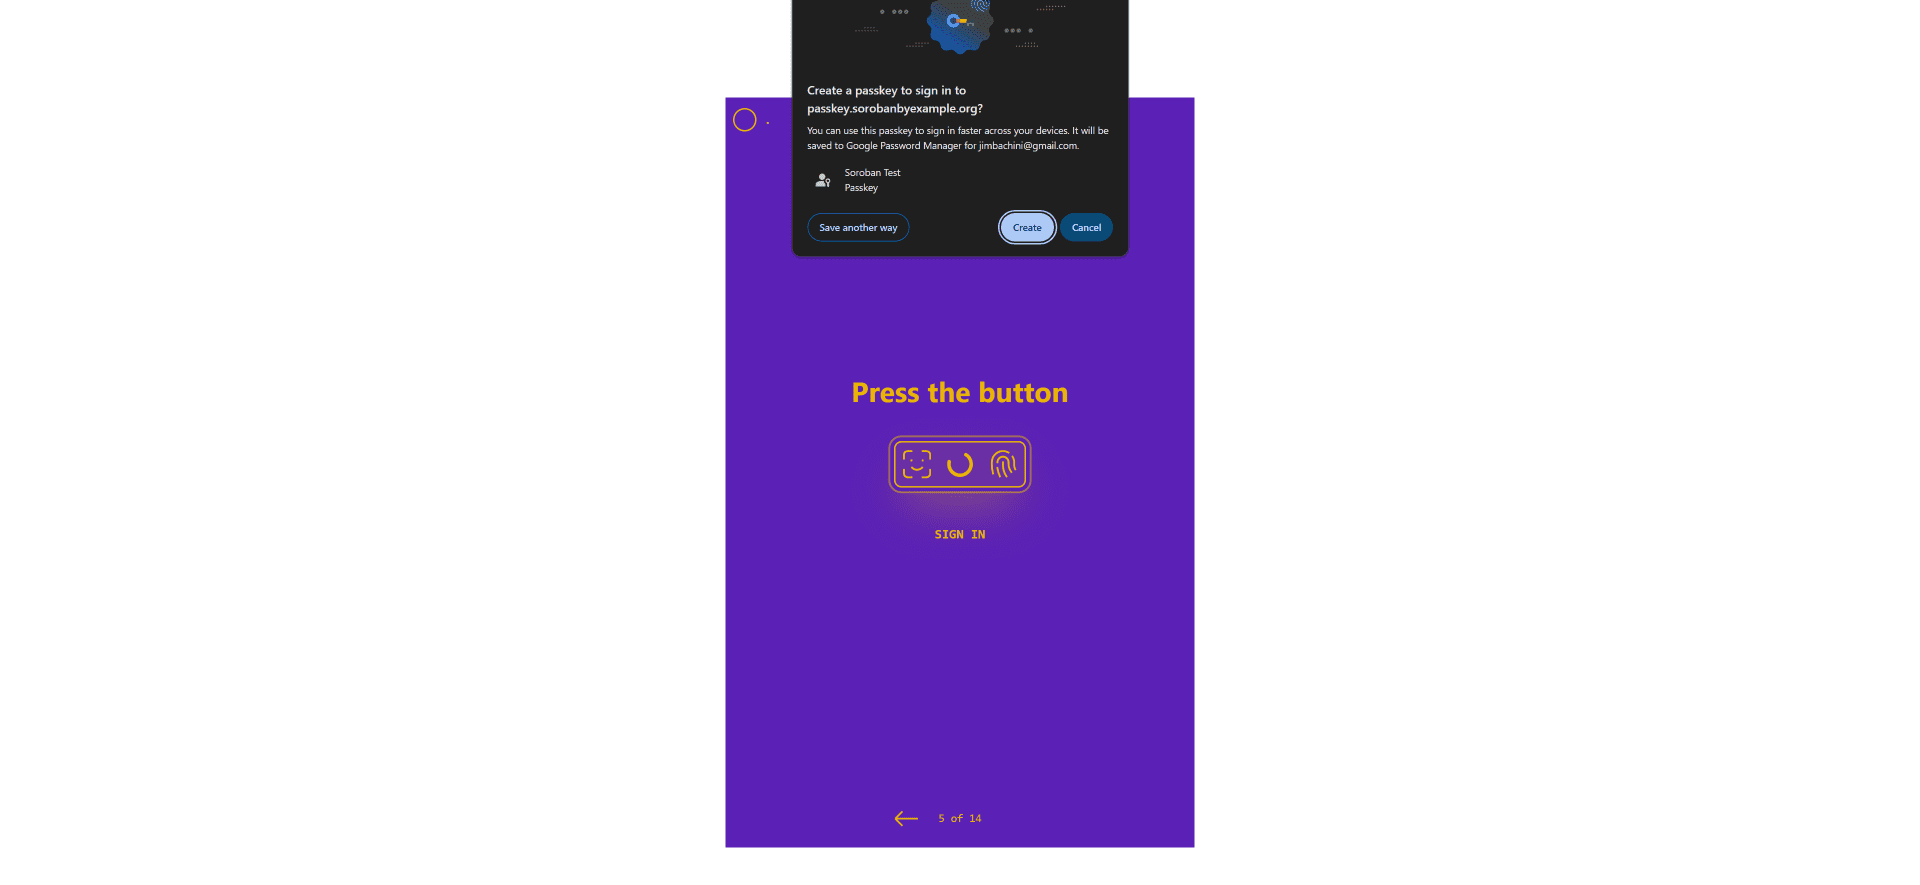
Now let’s look at how we use this passkey to sign a challenge.
const base64 = base64urlToBase64(credentialIdRef.current);
const credentialIdBuffer = base64ToUint8Array(base64);

const assertion = await navigator.credentials.get({
  publicKey: {
    challenge: new TextEncoder().encode(challenge),
    allowCredentials: [
      {
        type: "public-key",
        id: credentialIdBuffer,
      },
    ],
    userVerification: "required",
    timeout: 60000,
  },
});
This code handles the process of authenticating a user via WebAuthn by retrieving a previously registered credential and generating a signed assertion to prove the user’s identity.
First, the credential ID stored during the registration phase is converted from Base64 URL format to standard Base64 and then into a Uint8Array. This prepares the credential ID in the correct format to be sent to the authenticator.
Next, the navigator.credentials.get() method is called to request the signed assertion from the authenticator. This method sends a challenge, encoded into bytes using TextEncoder, to the authenticator. The allowCredentials field specifies which credentials the authenticator can use (i.e., the previously prepared credential ID), ensuring the authentication request is tied to the correct user. Additionally, the userVerification: "required" setting mandates that the user must authenticate themselves (e.g., via biometrics or PIN) before the assertion is generated.
Once the user successfully verifies themselves, the authenticator signs the challenge with their private key, and the resulting signed assertion is returned. This proof can then be sent to the Soroban smart contract to complete the authentication process, verifying that the user controls the credential.
Authenticating Signatures in Soroban Contracts
To authenticate a signature we will be taking a look at Tyler Van Der Hoeven’s excellent work: https://github.com/kalepail/soroban-passkey/
The passkey object generated on the frontend is converted and mapped into an appropriate format to send to the Soroban smart contract.
https://github.com/kalepail/soroban-passkey/blob/main/src/lib/vote_send.ts
We can then use the ECDSA secp256r1 library which is native to Soroban to verify the signature within a smart contract:
env.crypto().secp256r1_verify(&pk, &payload, &signature.signature);This method verifies whether the signature (&signature.signature) was generated by the private key corresponding to the public key (&pk) over the given payload (&payload).
Full code for the contract is here: https://github.com/kalepail/soroban-passkey/blob/main/contracts/contract-webauthn-secp256r1/src/lib.rs
In this code there is a factory contract creating a smart wallet deployment for every new public key. The smart wallet contract can include additional account abstraction features such as social recovery, sponsored transaction fees etc.
This opens the possibility of seamless two click/tap registration and credentials initiation for web3 UX flows.
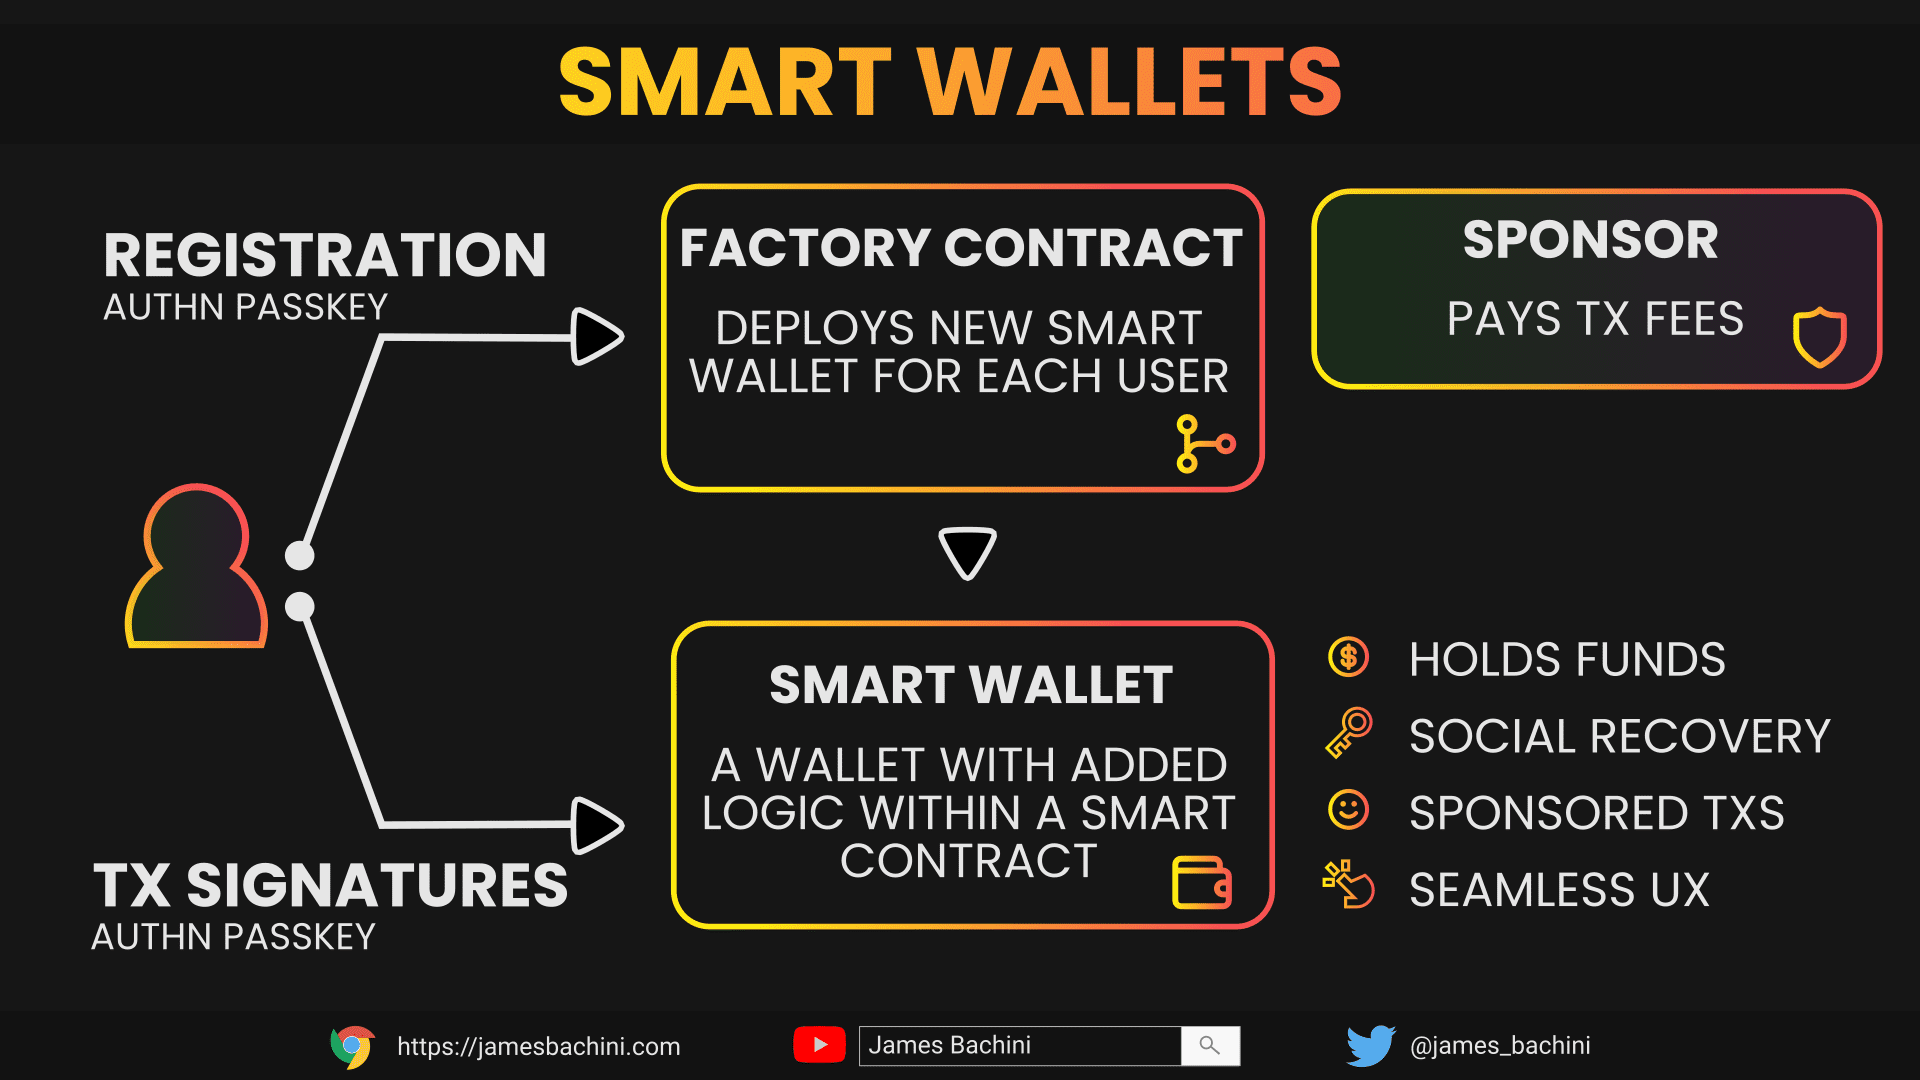
A user can create a new account at the click of a button, the tx fees are sponsored and a new smart wallet is deployed for each user. The passkey public key is stored in this contract for authentication.
Account Abstraction & The Future of Web3
Account abstraction is a powerful concept in blockchain technology that separates user accounts from the underlying blockchain accounts. This abstraction allows for more flexible and seamless authentication methods, such as biometric signatures and passkeys.
Benefits
- Simplifies onboarding for new users by removing the need for complex key management.
- Enables multi-factor authentication and reduces the reliance on a single private key.
- Allows developers to implement custom authentication logic within smart contracts.
- Potential to increase conversion rates for sign up flows
The integration of WebAuthn and passkeys into Web3 applications marks a significant step towards mainstream adoption. By leveraging biometric authentication and account abstraction, we can build more secure, user-friendly decentralized applications.
It’s hard for web3 companies to compete for mainstream audiences. If they spend the same marketing budget as a web3 company on advertising they generally get less conversions to users. This is because a significant proportion of any audience doesn’t have a digital wallet, funds to pay gas fees, inclination to figure this stuff out.
In the future account abstraction is going to make web3 platforms surpass web2 infrastructure in terms of user experience. This alongside the disruptive benefits of decentralized data and self-ownership means that we have a bright future as builders in web3!
Ready to dive deeper? Experiment with the passkey feature and build your own smart wallet. Check out the following resources for more information:
