
In this article I am going to demonstrate how anyone can learn some simple code to automate common tasks using a standard web browser. Browser automation is a great tool for productivity and scaling up repetitive tasks.
- What Can Be Automated and Why?
- Javascript Basics
- Automating The Developer Console
- An Example Automating LinkedIn Connections
- What is a Headless browser?
- Conclusion

What Can Be Automated and Why?
Have you ever found yourself carrying out the same monotonous task repeatedly on a website? Click here, then here, confirm, click here then here confirm. Things like this can and often should be automated using simple browser automation to save you time and effort.
If we assume it takes between 5 and 30 mins to create a basic browser automation script then anything you spend more than an hour a year doing should be automated.
Here are some examples:-
- Liking social media posts for specific niches
- Connecting and following social media accounts
- Finding and optimising images or icons
- Google search analysis
- Competitor website analysis
- PPC Keyword competition searches
- Checking ad spend across ad exchanges
- Checking revenues across affiliate networks
- Collating data from web sources into reports
- SEO keyword research
- Trading portfolio analysis
- Sentiment and trend monitoring
- Web scraping large data sets
Javascript Basics
I’m going to assume no prior knowledge in this article and will go over the basics that you’ll need to know to create simple scripts.
First let’s look at how HTML is structured with an example of a like button.
<button class="like-button" id="like-post-124">Like</button>In the example above word “Like” is encapsulated between a opening and closing button tag. The opening tag includes a class reference and a more specific ID. If we wanted to click a single element we would generally use the ID, if we wanted to click every like button on the page then we would use a class reference.
Now let’s look at some javascript code to click a like button.
document.getElementById('like-post-124').click();In the above example we use document.getElementById to reference an element by it’s ID. Then we just add the .click() function to click it.
How about if we wanted to click on every like button on the page…
const likeButtons = document.querySelectorAll('.like-button');
likeButtons.forEach((buton) => {
  button.click();
});
The first line creates an array of all the elements on the page with the class “like-button”. We then loop through these with the forEach command and use the .click() function to click it.
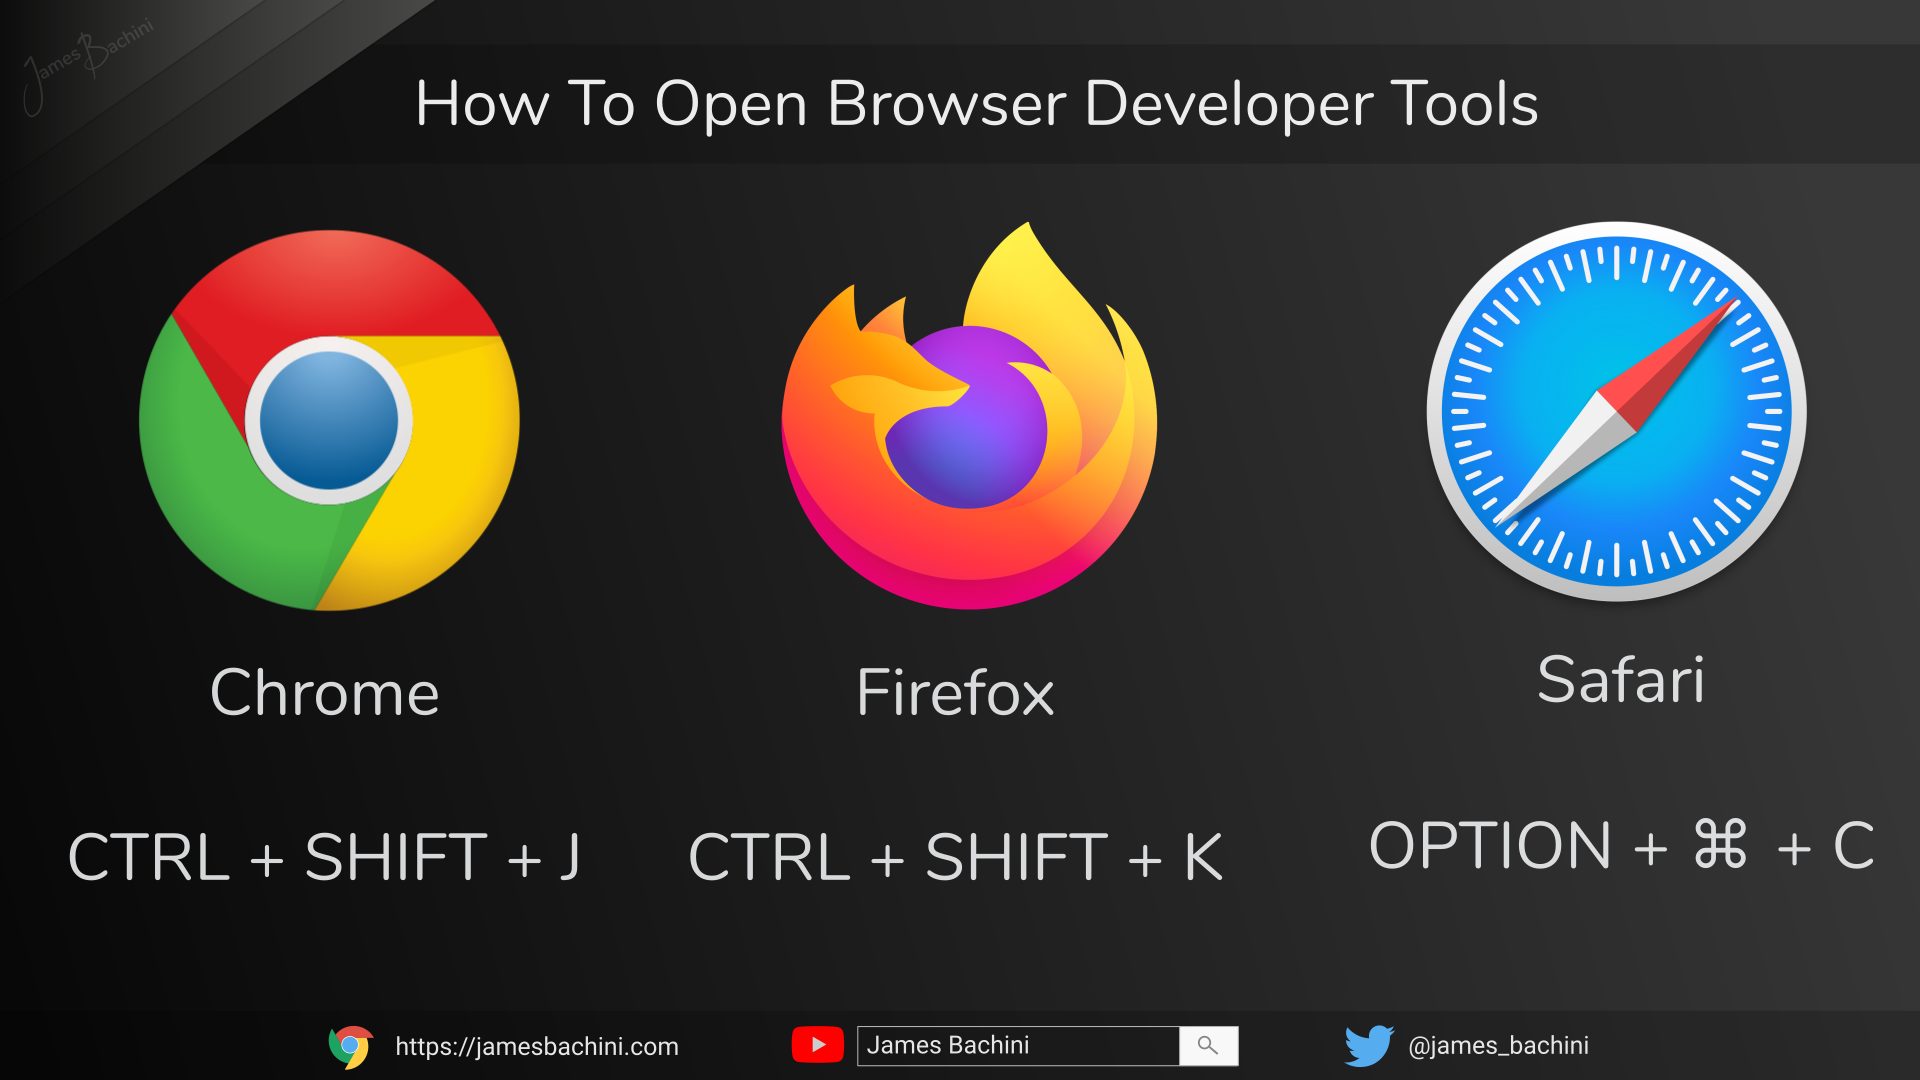
Now to find out what the class and ID’s are for different social networks and to execute this code we are going to be using a developer console which is part of every web browser.
Automating The Developer Console
Try opening up a developer console right now in your web browser.

Type in 2+2 and hit enter, you should get a result of 4 pop up in the console log. This is where we will be executing our Javascript.
So let’s start with a simple button on this page that we want to click.
<button id="my-button" onclick="alert('you smashed that button')">Click This</button>HTML Code:
<button id="my-button" onclick="alert('you smashed that button')">Click This</button>You can click it manually to start with and then let’s try clicking it programmatically from the dev console.
So we can see here the button has a id of my-button but in most cases we wouldn’t have the HTML laid out so we need to find that reference.
Right click on the button and go to “inspect”, this will bring up the element inspector where we should be able to see the HTML for the button.
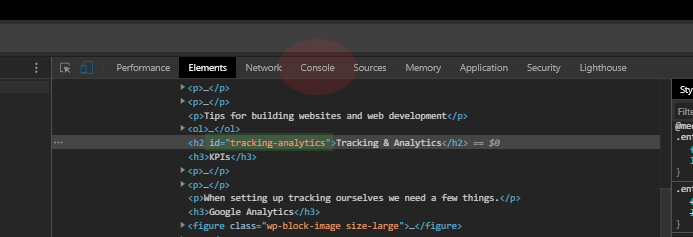
So now we know the ID we can switch between the “Elements” and the “Console” using the top menu.
Now let’s execute the code from earlier to click the button.
document.getElementById('my-button').click();Copy and paste this into the console and hit enter.
We have clicked a button using Javascript code in the developer console. Time to move on to a more useful example.
An Example Automating LinkedIn Connections
Let’s say I have just joined a new company and want to add all my new colleagues as connections on Linkedin. We can do a search for the company and then automate the adding of connections with a script.
let total = 0;
let target = 50;
const clickAll = () => {
  let count = 0;
  let btns = document.querySelectorAll('.search-result__actions .search-result__actions--primary');
  btns.forEach((btn) => {
    count ++;
    total ++;
    setTimeout(() => {
      btn.click();
      setTimeout(() => {
        let confirmations = document.querySelectorAll('.artdeco-modal__actionbar .artdeco-button--primary');
        confirmations.forEach((cBtn) => { cBtn.click() });
      },3000);
    }, count * 30000);
  });
  if (total < target) {
    setTimeout(() => {
      let nextBtns = document.querySelectorAll('.artdeco-pagination__button--next');
      nextBtns.forEach((nBtn) => { nBtn.click() });
    }, (count + 1) * 30000);
    setTimeout(() => {
      clickAll();
    }, (count + 2) * 30000);
  }
}
clickAll();
There are some complexities here in that we are going to have to loop through the different pages of results and also slow it down so it can run in the background without triggering Linkedin’s restrictions.
So we first setup a function called clickAll which will act as a container for our script. We also declare some variables including the target number of accounts to connect with which will act as a maximum. The connect buttons are collected into an array called btns and each is clicked after a setTimeout delay. Once clicked a verification pop up comes up on Linkedin which can then be clicked to confirm after another delay. Once we have clicked all the “connect” buttons on the page we move on to the next page and restart the clickAll function until we reach our target.
A word of warning before you try this is that LinkedIn does have spam filters in place so use with caution and in an ethical manner. This is provided as an example only.
So we have a semi-automated task that takes a lot of the grunt work out of a job but we still have to log in and open up the dev console and then let it run in the background. The next step for developers is using a headless browser to fully automate the process as a command line script.
What is a Headless Browser?
A headless browser is a web browser which runs without displaying the window on a monitor. When automating tasks we can create scripts that can be run from the command line. These can then be fully automated and scheduled storing data in more complex applications.
Let’s look at some popular open-source headless browsers.
Selenium
Selenium was the first application that I used for browser automation. It’s been around for over a decade and is still a popular choice for automating tasks. It has a great scaling capability (selenium grid) which allows you to run multiple instances either headless or displayed. It can connect with different browsers and emulate mobile devices.
Selenium is a fairly complex application but there are additional layers that make it easier to use such as https://nightwatchjs.org/
For more information on Selenium visit the project documentation: https://www.selenium.dev/documentation/en/
Puppeteer
Puppeteer has been my go to choice for the last couple of years for doing backend browser automation. It is much simpler to setup and get started with than Selenium and it has some really great features. Two things I like a lot is the ability to switch between headless and displayed browser easily and the ability to take screenshots at different resolutions.
Here is an example function that uses Puppeteer to collect a bunch of information about a website such as titles, keywords, h1 tags etc and then takes a desktop and mobile screenshot of the page.
/**
 * @method crawlPage
 * @description Use pupeteer headless browser to crawl the html of the url provided
 */
const crawlPage = async(url,doShowcase) => {
  const browser = await puppeteer.launch({
    headless: true,
  });
  const page = await browser.newPage();
  await page.setViewport({
    width: 1280,
    height: 720,
  });
  setTimeout(() => { browser.close(); }, 30000);
  await page.goto(url,{
    waitUntil: 'load',
    timeout: 15000,
  }).catch(err => {
    console.error('Sitecrawl error 49: '+err);
  });

  const result = await page.evaluate(() => {
    const siteData = {};
    const h1 = document.querySelector('h1');
    if (h1) siteData.title = h1.innerText;
    const title = document.querySelector('title');
    siteData.keywordSearch += title+',';
    if (title) siteData.title = title.innerText;
    const html = document.documentElement.outerHTML;
    const meta = document.querySelectorAll('meta');
    if (meta) {
      meta.forEach((m) => {
        if (m.name === 'description') {
          siteData.description = m.content.trim();
          siteData.keywordSearch += m.content+',';
        }
        if (m.name === 'keywords') {
          siteData.keywords = m.content;
          siteData.keywordSearch += m.content+',';
        }
      });
    }
    const paragraphs = document.querySelectorAll('p');
    if (paragraphs) {
      paragraphs.forEach((p) => {
        siteData.text += p.innerText+"\n";
        siteData.keywordSearch += p.innerText+',';
      });
    }
    return siteData;
  }).catch(err => {
    console.error('Sitecrawl error 236: '+err);
  });
  if (!result) return false;
  result.domain = url.split('https://').join('').split('http://').join('').split('/')[0].toLowerCase().split(/[^.\-a-z0-9]/).join('');
  siteData.images = {};
  siteData.images.desktop = siteData.domain+'_desktop.png';
  siteData.images.mobile = siteData.domain+'_mobile.png';
  await page.screenshot({ path: showcaseImageDirectory+siteData.images.desktop });
  await page.setViewport({
    width: 360,
    height: 640,
  });
  await page.screenshot({ path: showcaseImageDirectory+siteData.images.mobile });
  await browser.close();
  siteData.ts = new Date().getTime();
  return siteData;
};
More information on Puppeteer can be found on the npm package manager: https://www.npmjs.com/package/puppeteer
Conclusion
Browser automation can be used to increase efficiency of repetitive tasks online. Javascript is the obvious choice for automating tasks in a web browser. Simple scripts can be executed in a browser developer console and more complex applications can be coded using headless browsers.
