

Vyper is a pythonesque smart contract language that can be compiled and deployed on Ethereum and other EVM blockchains. 90%+ of blockchain devs use Solidity but there are some big projects such as Curve using Vyper and it’s growing in popularity and tooling compatibility.
The best way to get started with Vyper is to head over to remix.ethereum.org which has a vyper plugin. I’ve written a quick tutorial here on how to compile and deploy a simple contract in vyper.
This article is geared towards devs who already have a basic understanding of smart contract development in Solidity and want to broaden their skillset to include Vyper. I’ll be discussing the key differences in syntax, formatting and design considerations.
- Vyper Video Tutorial
- Code Comments & Versioning in Vyper
- State Variables in Vyper
- Interfaces, Events, Structs in Vyper
- Statements & Loops in Vyper
- Everything Else & Useful Vyper Snippets
- Testing, Deploying & Verifying Vyper Contracts
Vyper Video Tutorial

Code Comments & Versioning in Vyper
Let’s start with something simple, code comments are generally done with a # followed by a single line and multiple line comments are enclosed within three quotation marks “”” which is equivalent to /* */ in Solidity.
# @version ^0.4.0
"""
@title MyContract
@author James Bachini
@license MIT
@notice Can use standard NatSpec formats
@dev More code less comments = better
"""
It’s far less common to specify a compiler version in Vyper and many contracts will omit the above completely and get straight into the code. Then just placing a # single one liner above each function describing what it does
State Variables in Vyper
For the most part it is not possible to define state variables when initializing them. So we have to do something like this to set them in a constructor function which runs only once initially when the contract is first deployed.
amount: public(uint256)

@external
def __init__():
    self.amount = 69420
Here we are creating a public unsigned integer variable called amount. This is then given a value in the __init__ function which is the constructor. Note that the state variables are referred to within the function as self.amount
The only exception where you can define state variables in the upper scope is with constant (immutable) values.
max: constant(uint256) = 1000 * 10 ** 18The other thing that will continue to catch you out is the lack of a semi-colon at the end of each line ;
Interfaces, Events, Structs in Vyper
These are generally defined a the top of a contract similar to Solidity and in this order with interfaces, then events, then state variables and structs.
interface ERC20:
    def transfer(recipient: address, amount: uint256): nonpayable
    def balanceOf() -> uint256: view

event Deposit:
    user: indexed(address)
    amount: uint256

struct Deposits:
    user: address
    amount: uint256

deposits: DynArray[Deposits, 128]
balances: public(HashMap[address, uint256])

@external
@payable
def deposit():
    self.deposits.append(Deposits({user: msg.sender, amount: msg.value}))
    log Deposit(msg.sender, msg.value)
    self.balances[msg.sender] += msg.value
The interface should look fairly familiar as standard ERC20 functions defined for transfer (write function) and balanceOf (read function).
We then define an event which can be fired using the log internal function (log is equivalent of emit in Solidity). Note that we are indexing the user addresses which makes it easier to lookup and query log data.
The struct Deposits is fairly standard and then we go on to use the DynArray keyword to create a dynamic array bounded to a max limit of 128 values. Note that in a production environment we would manually need to count the deposits and create a limit to avoid bad things happening. There is no array.length function in vyper to get the length of a dynamic array 🙁
We then define a external, payable function which means users can send ETH when calling it. We add the deposit to the deposits array, log it and then increase the HashMap for balances which is just like a mapping in Solidity.
If we wanted to use the interface we would call it with a contract address, something like:
ERC20(tokenAddress).transfer(msg.sender, 1)Note that Vyper actually includes standard interfaces for the following common token standards and we can include all the functions with a couple of lines of code
- ERC165
- ERC20
- ERC20Detailed
- ERC4626
- ERC721
from vyper.interfaces import ERC20
implements: ERC20
One of the biggest negatives of using Vyper is the lack of library support. It is not designed to be modular of have functions overwritten and other alchemy like Solidity is. If you want to create a token you need to actually write out the logic from scratch or copy it from somewhere into your contract, you can’t just import an openzeppelin library.
Statements & Loops in Vyper
Statements and loops are fairly straightforward with the syntax change of using indentation rather than brackets. Speaking of indentation we are using 4 spaces rather than tabs. If that doesn’t trigger you then we are also going to be using under_scores rather than camelCase for variables names.
even_numbers: public(uint256)
odd_numbers: public(uint256)

@external
def run(_max: uint256) -> uint256:
    for _i in range(100):
        if _i >= _max:
            break
        elif _i % 2 == 0:
            self.even_numbers+= 1
        else:
            self.odd_numbers+= 1
    return self.odd_numbers
In this code snippet we define a external run function which accepts and returns a uint256 value. We then create a for loop which goes through a range of 100 values.
There is then a if statement where if the loop value is greater than the input value it breaks out of the loop. Instead of else if we use elif to check for even numbers using the modulus operator. Finally if all else failes we += 1 to the oddNumbers state variable before returning that value to the output of the function.
Everything Else & Useful Vyper Snippets
Let’s look at some other useful snippets that are widely used.
In this first example we are sending the contract’s ETH balance to the owner address.
owner: public(address)

@external
def __init__():
    self.owner = msg.sender

@internal
def onlyOwner():
    if msg.sender != self.owner:
        raise "Only Owner"

@external
def sendAll(_to: address):
    self.onlyOwner()
    send(_to, self.balance)

@external
@payable
def __default__():
    self.owner = msg.sender
We start by setting a contract owner who is the deployer address of the contract. We then create an internal onlyOwner function which is going to act like a modifier. Note we are demonstrating how to raise an exception here with the raise keyword which will revert the transaction with a custom message.
Then we create a sendAll external function which calls the onlyOwner() before sending the contract’s balance to the address provided. Finally there is a fallback function __default__() which updates the contract owner to the last person that sent ETH to the contract.
The next example looks at creating a raw call to an ERC20 token contract to transfer some coins.
@external
def send(_token: address, _amount: uint256):
    _response: Bytes[32] = raw_call(
        _token,
        concat(
            method_id("transfer(address,uint256)"),
            convert(msg.sender, bytes32),
            convert(_amount, bytes32),
        ),
        max_outsize=32,
    )
We define a external function which accepts any token contract address and an amount. It then attempts to call transfer on the external token contract moving funds from our contract address to the caller of the transaction.
There’s more Vyper code to take a look at in the following resources:
- Vyper Official Examples
- Vyper Official Docs
- Vyper By Example
- Curve Finance Contracts
- Yearn Finance Contracts
Testing, Deploying & Verifying Vyper Contracts
For testing it’s recommended to use pyTest and Brownie to create python unit tests.
Let’s first go ahead and install viper and brownie.
pip install vyper
pip install eth-brownie
brownie init
Here’s an example of a basic unit test for an ERC20 transfer
import pytest

from brownie import Token, accounts

@pytest.fixture
def test_transfer():
    initial_supply = 100
    account1 = accounts[0]
    account2 = accounts[1]
    token = Token.deploy(initial_supply, {'from': account1})

    amount_to_transfer = 10
    tx = token.transfer(account2, amount_to_transfer, {'from': account1})

    assert token.balanceOf(account1) == initial_supply - amount_to_transfer
    assert token.balanceOf(account2) == amount_to_transfer
    assert tx.return_value is True
We can run tests using the following command:
brownie testTo deploy contracts we can use remix. Compile the contract using the Vyper plugin then go to the deploy tab, change the network to “Injected Proider – Metamask”. Select the network you want to deploy to from the metamask menu and then click deploy.
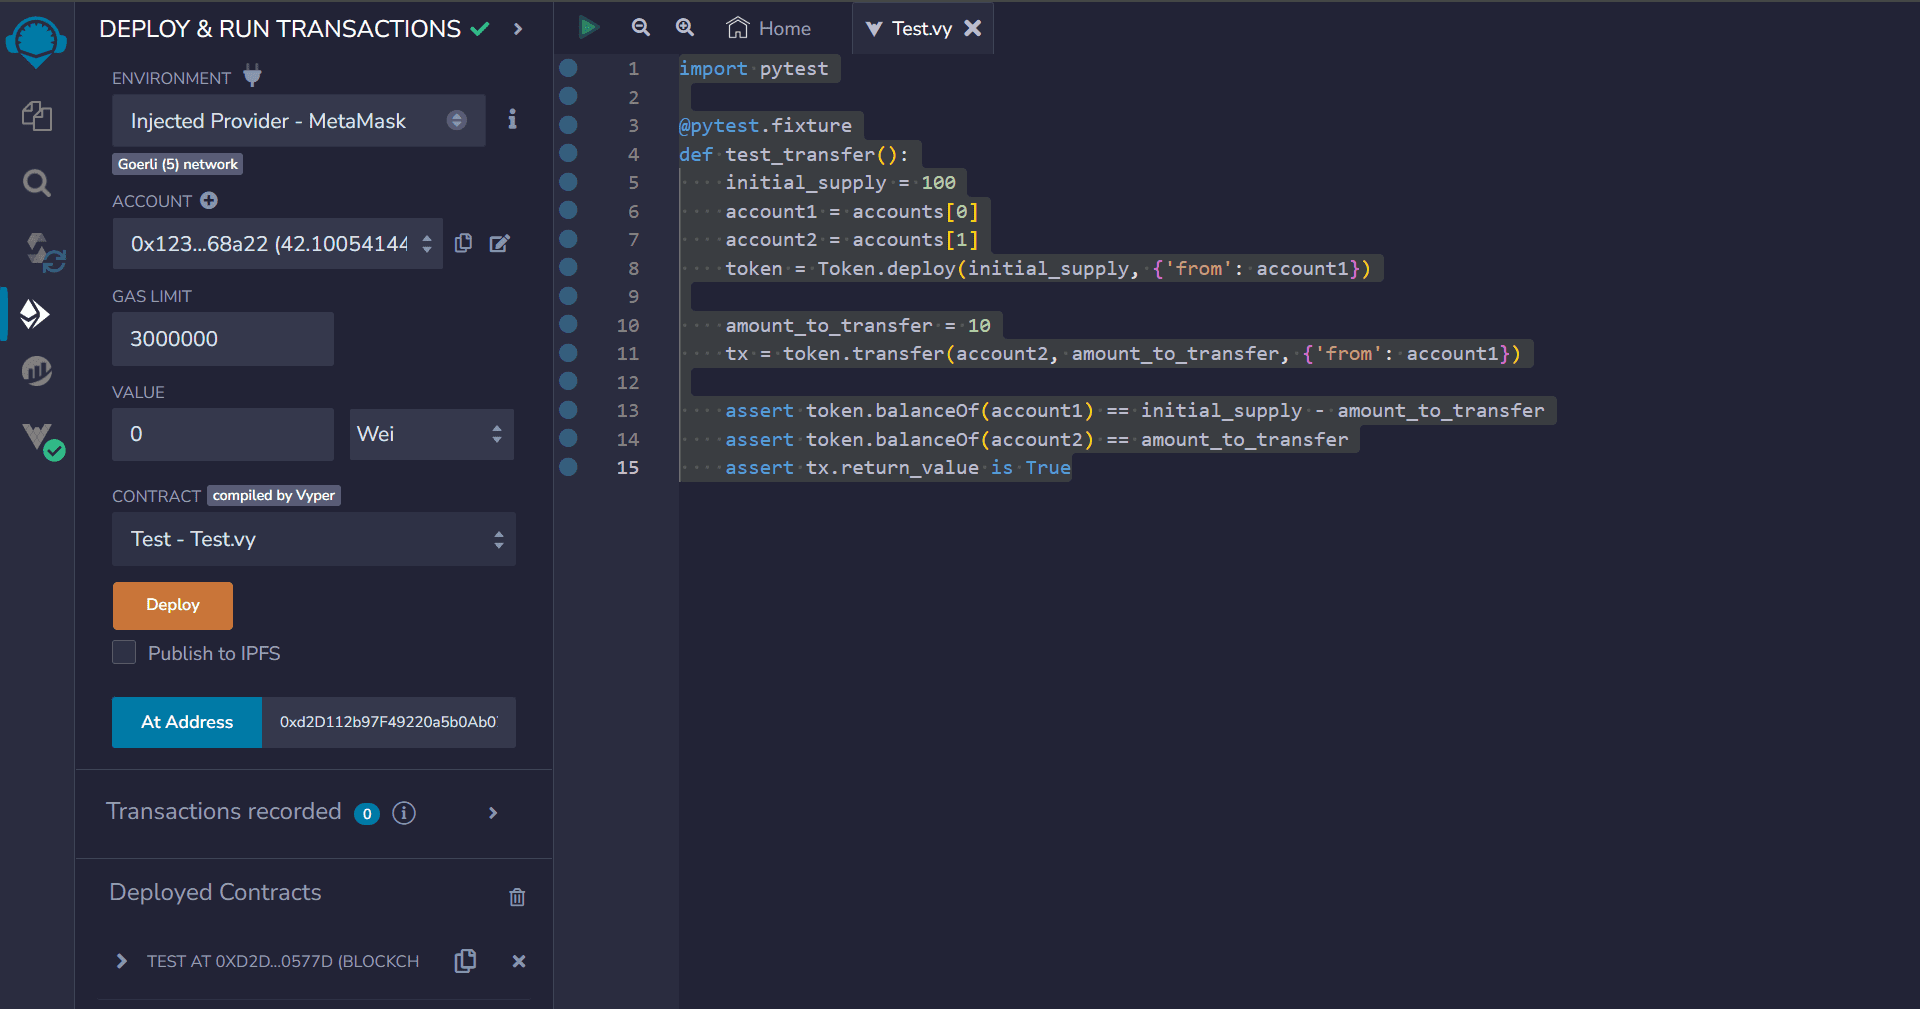
Note that the contract wont go straight into the Deployed Contracts section so you’ll need to look up the transaction on Etherscan, find the new contract address and use the “At Address” button (see screenshot above).
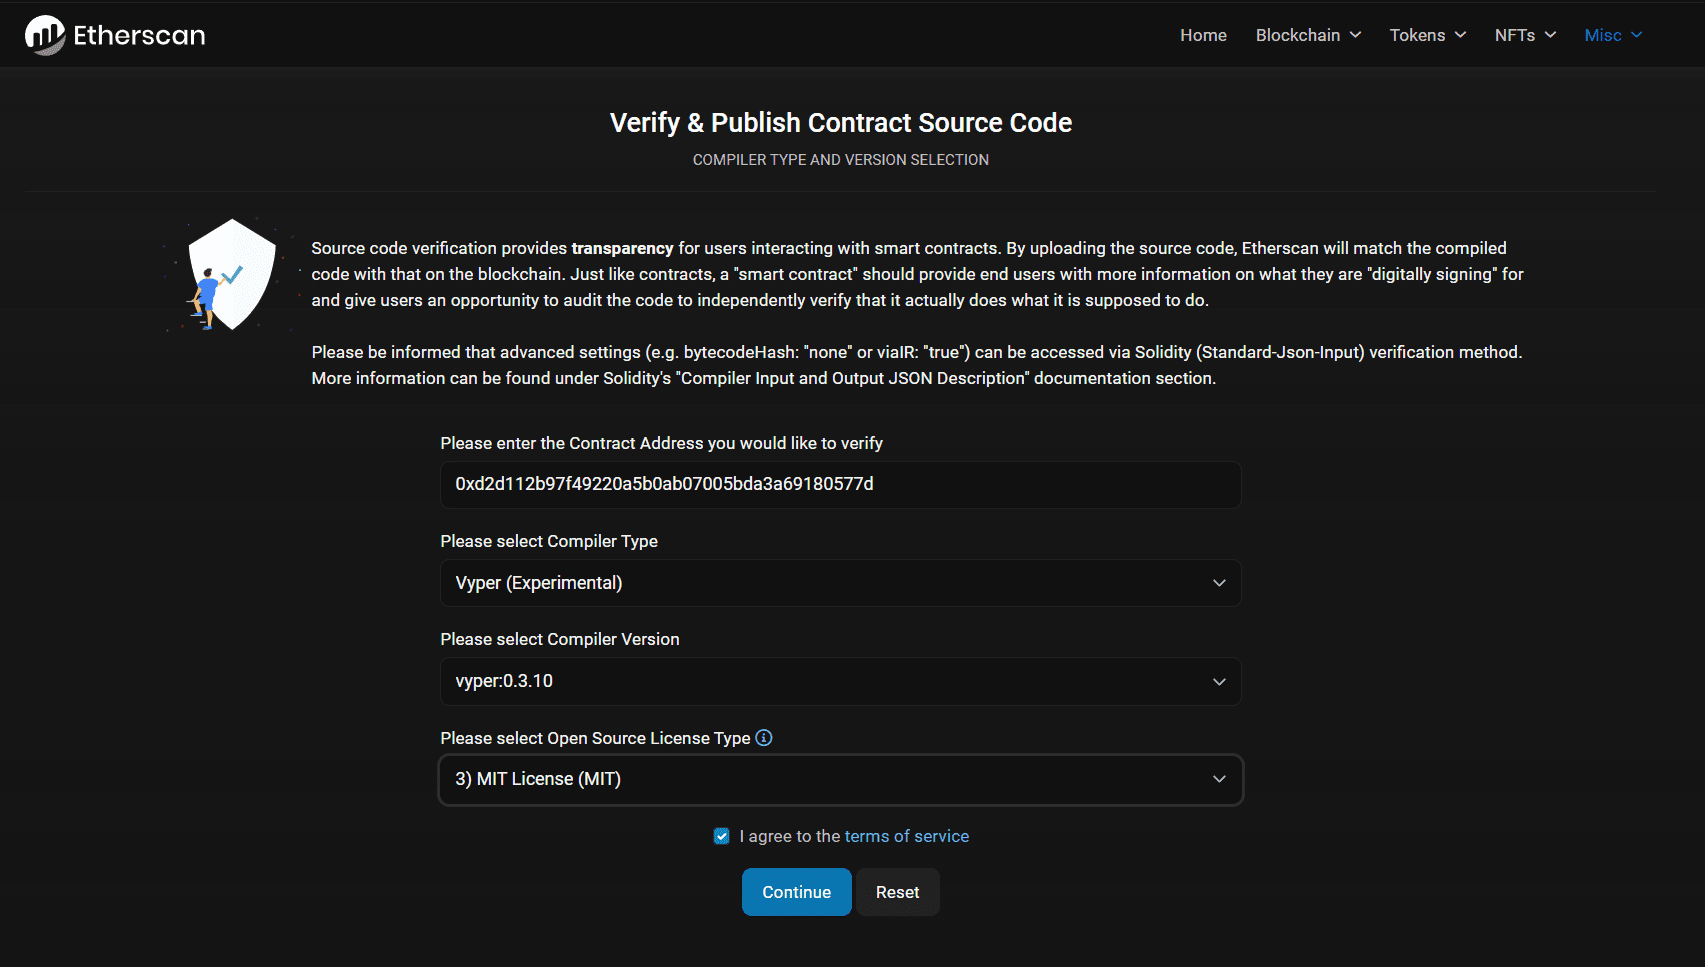
To verify we can use etherscan to manually verify the code. This is quite simple as most files are flat as standard due to the lack of libraries.
That’s all for now, if people enjoyed this let me know on Twitter and I’ll make some more Vyper tutorials and demos on the blog and on YouTube.
