

Connect wallet, click button, confirm transaction. It gets old pretty quick, especially when you need to do it daily to compound returns. This tutorial takes you through the process of using a block explorer to find functions, calling those functions from a script and then executing to harvest and stake reward tokens. The aim is to fully automate yield farming on liquidity positions that don’t auto-compound.
- Automate Yield Farming Tutorial Video
- Setting Up A Hot Wallet
- Using A Block Explorer
- Node.js & Ethers.js
- Define Addresses & Functions
- Check Balances
- Harvest Rewards
- Staking Rewards
- Testing & Timeouts
- Open Source Code
Automate Yield Farming Tutorial Video

Setting Up A Hot Wallet
A hot wallet is a digital wallet which stores funds and its private key is stored on an internet connected device. Generally they should be avoided because hot wallets are easier to hack than cold storage wallets or a browser plug-in like Metamask. However if you want to execute scripts you need the wallet that holds the funds to sign the transaction to claim them.
This script uses dotenv to store an Ethereum address and private key. You could take this a step further and encrypt any data and use a pass phrase on execution.
If you don’t have a wallet address you can either export one from Metamask or you can use a wallet generator like this one: https://github.com/jamesbachini/Ethers-Vanity-Address
The address can then be put in to a text file named .env with the variables laid out like this:
auroraAddress=0x0000000000123
auroraPrivateKey=0x000000000000000000456
It’s also worth thinking about where you will run the script from. It can be run from a personal computer but only when that computer is on, you could set up an automated task for example. An alternative would be to set up a dedicated secure cloud instance (server) and have the script run on there so that it can execute 24/7 via a cron job.
Using A Block Explorer
We are going to need some information such as contract addresses and function names. To get these we will execute the yield farming process we want to automate manually and then paste the transaction addresses into a block explorer.
For this tutorial I am going to be using a decentralised exchange called Trisolaris on Near Protocol’s Aurora blockchain. Aurora is an EVM (Ethereum virtual machine) compatible chain so this type of script will work with other platforms like Sushiswap on Ethereum or layer 2’s as well. Aurora also has no transaction fees which makes it ideal for this kind of auotcompounding script because gas fees don’t eat in to the compounding profits.
The first stage is to claim TRI rewards for my TRI-USDT liquidity position here: https://www.trisolaris.io/#/tri/0xFa94348467f64D5A457F75F8bc40495D33c65aBB/0x4988a896b1227218e4A686fdE5EabdcAbd91571f/11
The second stage is to stake the claimed TRI here: https://www.trisolaris.io/#/stake
Once we confirm the transaction in Metamask we get a receipt with an option to view the tx in a block explorer. This is the block explorer transaction for the harvest function to claim rewards.
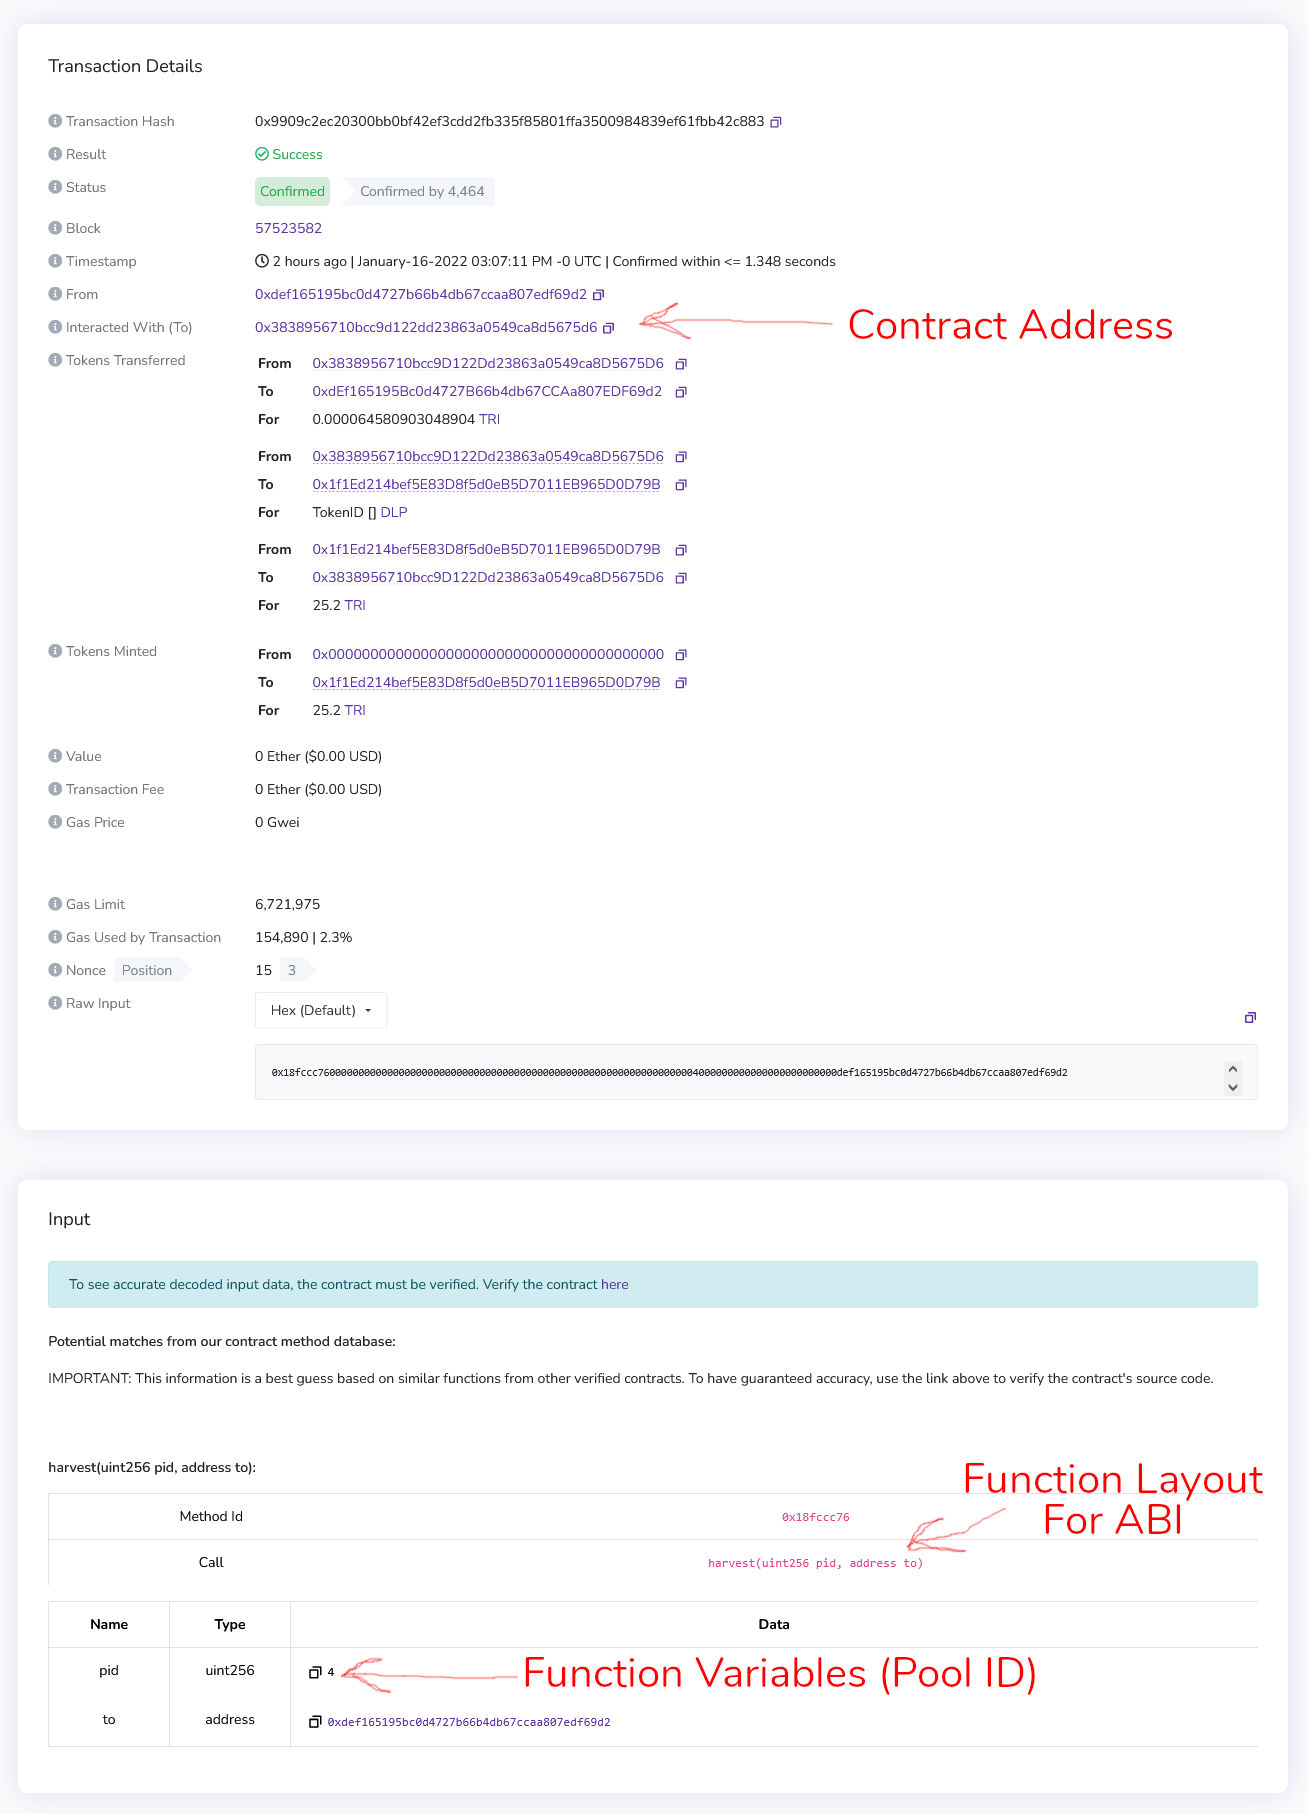
You can see we have some useful information here. The “Interacted With” address provides us with the contract address for the pool manager. The “Call” gives us a layout for the function so we can write a makeshift ABI and the pid or pool ID variable is shown below which we will need in the script to tell the contract which pool we want to claim tokens from.
Automate Yield Farming With Node.js & Ethers.js
For this script I’ll be using NodeJS which is a Javascript runtime for executing command line scripts. It can be installed from here: https://nodejs.org/
I’ll also be using Ethers.js which is a library for interacting with smart contracts. You could also use the popular Web3.js library as they are very similar.
Once node.js is installed let’s open up a terminal (command prompt) and navigate to the directory where we saved the .env file. Then use npm to install the two modules we have discussed.
cd c:\mydirectory\
npm install ethers
npm install dotenv
The final thing we will need is a text editor and for this I’d recommend Microsoft VSCode.
Define Addresses & Functions
Now let’s create a new file using the text editor and call it autocompound.js
Let’s import and configure our libraries
import { ethers } from 'ethers';
import dotenv from 'dotenv';
dotenv.config();

const provider = new ethers.providers.JsonRpcProvider(`https://mainnet.aurora.dev`);
const signer = new ethers.Wallet(process.env.auroraPrivateKey, provider);
You’ll notice I’m using the mainnet.aurora.dev URL for the RPC provider. If you wanted to set this up Ethereum then you would normally use a RPC provider like Infura.
The signer variable uses the private key set in the .env file earlier to create a wallet instance.
Now let’s define some ABI’s, an ABI is like a layout plan for a smartcontract function and it tells our script how to pack data to send in a transaction.
Our script needs to execute two different contract transactions, one to harvest TRI tokens then another to stake those TRI tokens for xTRI tokens. For this we will need a standard ERC20 token ABI to check balances, an ABI for the harvest contract and an ABI for the staking contract.
const erc20Abi = ["function balanceOf(address) view returns (uint)"];
const poolAbi = ["function harvest(uint256 pid,address to)"];
const stakingAbi = ["function enter(uint256 _triAmount)"];
Now let’s set up some contract addresses
const triToken= `0xFa94348467f64D5A457F75F8bc40495D33c65aBB`;
const xtriToken = `0x802119e4e253D5C19aA06A5d567C5a41596D6803`; // staking token
const triPool = `0x3838956710bcc9D122Dd23863a0549ca8D5675D6`; // TRI-USDT
const triStaking = `0x802119e4e253d5c19aa06a5d567c5a41596d6803`;
const poolID = 4; // TRI-USDT
The triPool contract was the one from the block explorer screenshot earlier. We can also see the token contract addresses by clicking on the token names in the block explorer. The triStaking contract is from the second transaction to stake rewards and the poolID is what we found earlier relating to which pool we want to harvest rewards from.
Check Balances
Now let’s connect to the TRI and xTRI token contracts and check our balances to make sure everything is working.
const xtri = new ethers.Contract(xtriToken, erc20Abi, provider);
const tri = new ethers.Contract(triToken, erc20Abi, provider);
let xtriBalance = await xtri.balanceOf(process.env.auroraAddress);
console.log('$xTRI: ',ethers.utils.formatEther(xtriBalance.toString()));
let triBalance = await tri.balanceOf(process.env.auroraAddress);
console.log('$TRI: ',ethers.utils.formatEther(triBalance.toString()));
We are using the token contract address and erc20 ABI to set this up then calling the balanceOf and passing in our address from the .env file.
The result is then converted to a readable string and printed to screen using console.log();
Harvest Rewards
Now let’s get into the fun bit and harvest some rewards.
const pool = new ethers.Contract(triPool, poolAbi, provider);
const signedpool = pool.connect(signer);
const harvestTX = await signedpool.harvest(poolID, process.env.auroraAddress);
console.log(`harvestTX: ${harvestTX.hash}`);
Note because this is a write transaction we need to sign it and create a signedPool instance with our wallet authorisation.
We could then recheck balances to make sure the TRI rewards have been harvested.
Staking Rewards
From here we want to stake the TRI token rewards we just harvested using the staking contract.
const staking = new ethers.Contract(triStaking, stakingAbi, provider);
const signedStaking = staking.connect(signer);
const stakingTX = await signedStaking.enter(triBalance);
console.log(`stakingTX: ${stakingTX.hash}`);
Again this is a write transaction that requires authorisation so we need to set up a signedStaking instance. The function name is “enter” to enter the staking pool and we are passing through an updated triBalance.
Testing & Timeouts
When testing I had issues with it going to fast and getting duplicate nonce issues in the queued transactions. I add some 2 second timeouts between each stage which fixed that issue and gave the blockchain time to catch up.
await new Promise(r => setTimeout(r, 2000));Finally I updated and printed off the token balances one more time to make sure everything had gone through as expected.
triBalance = await tri.balanceOf(process.env.auroraAddress);
console.log('$TRI: ',ethers.utils.formatEther(triBalance.toString()));
xtriBalance = await xtri.balanceOf(process.env.auroraAddress);
console.log('$xTRI: ',ethers.utils.formatEther(xtriBalance.toString()));
Open Source Code
Of course this is all open source code and available on Github:
https://github.com/jamesbachini/Aurora-Trisolaris-Auto-Compound-Script
Note that is for educational purposes, hasn’t been audited and is not production ready to use for financial transactions.
I hope that this tutorial on how to automate yield farming has served as a good example for how you can dig into the smart contract functions behind the user interfaces and interact with your own code.
This is what it looks like when run:-

