
In this article I will create a new token and make it available to swap on a decentralised exchange. I’ll be deploying a solidity smart contract to mint an ERC20 token on Ethereum and setting up a liquidity pool on Uniswap v3.
- Create A New Token & Liquidity Pool [Video]
- ERC20 Token Smart Contract
- Deploying A New Token To Ethereum
- Minting Tokens Using Truffle Console
- How To Set Up A Uniswap Liquidity Pool
- Swapping ETH For Our New Token
- Conclusion & Cost Analysis
Create A New Token & Liquidity Pool [Video]
This video provides an overview of the process or creating a new token and setting up a liquidity pool. More details and code snippets below.

ERC20 Token Smart Contract
Let’s first take some time to get familiar with the smart contract which will be used to create a cryptocurrency token.
In this tutorial I’ll be using the OpenZeppelin smart contract templates. The ERC20 contract that we will be using has been widely used and audited by numerous teams.
Let’s first try importing and playing with one of the contracts in the remix IDE at https://remix.ethereum.org
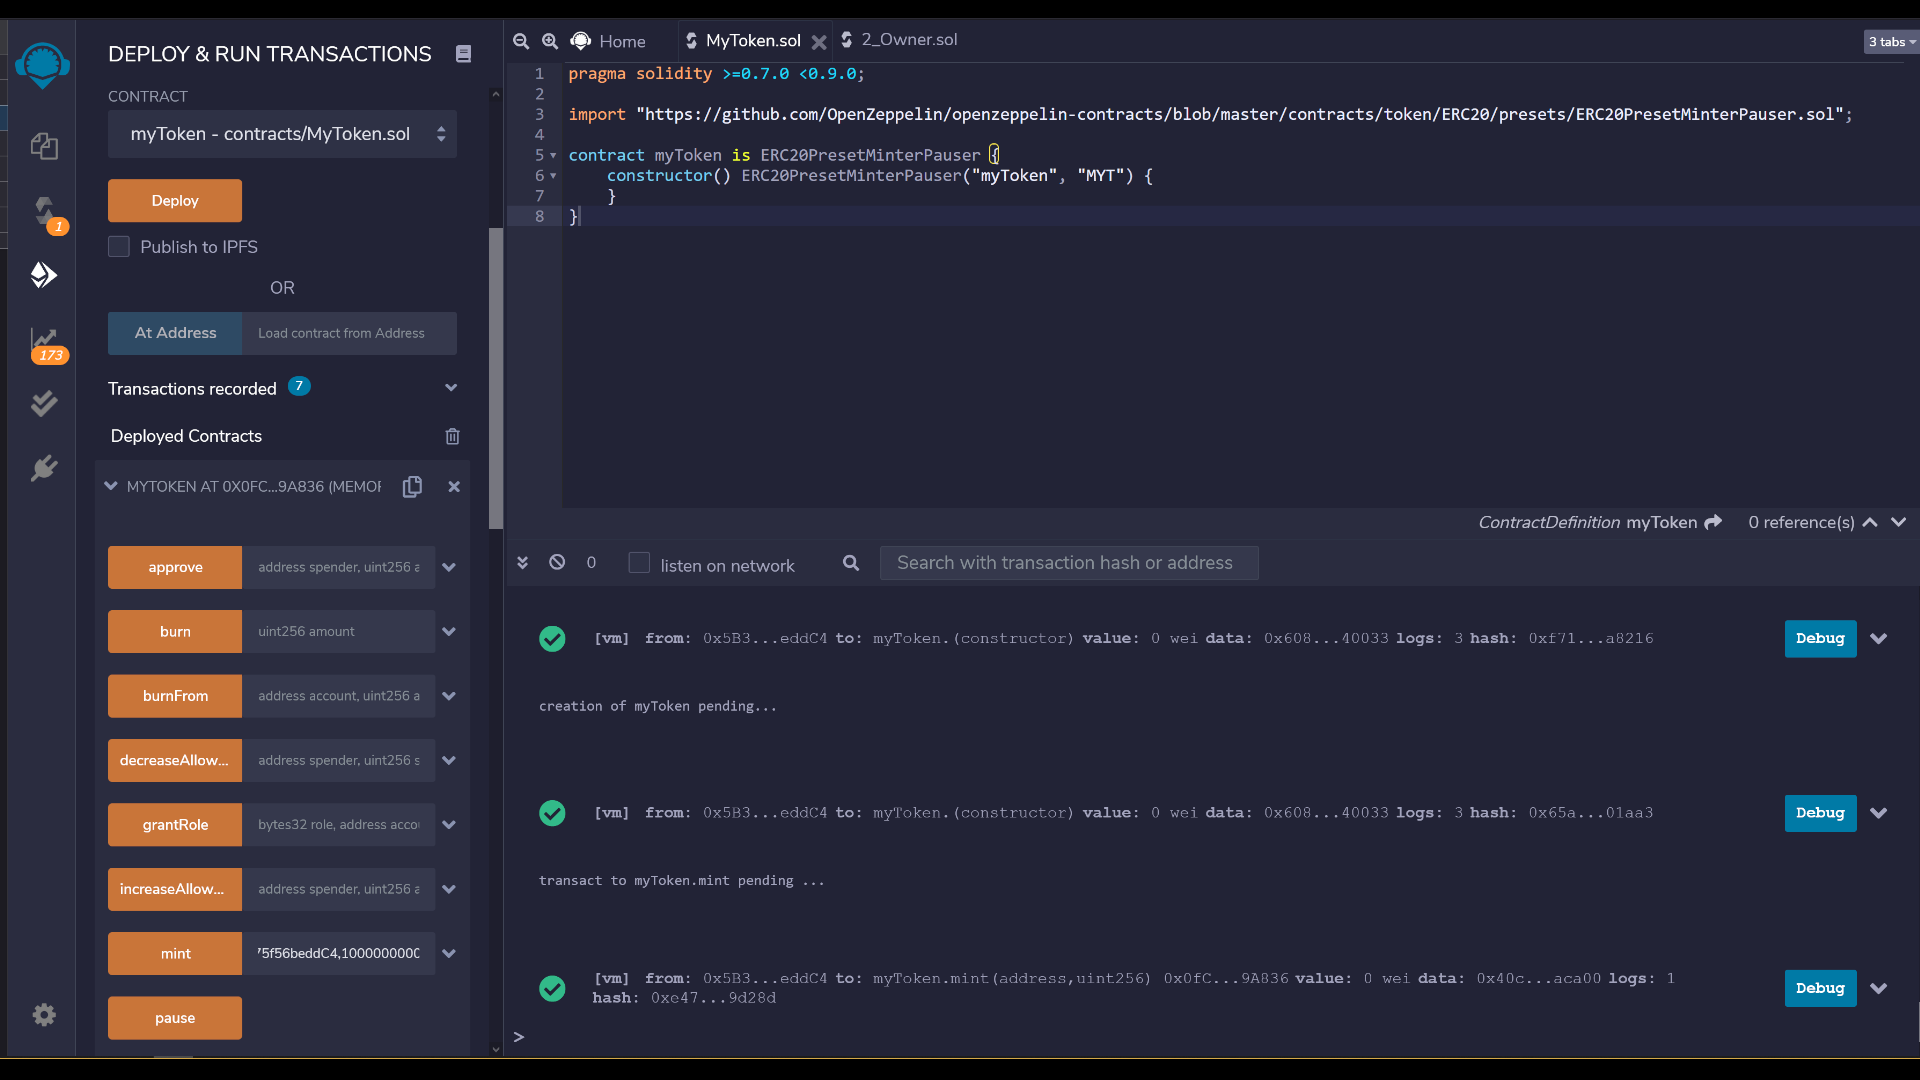
Create a new workspace and add a file called myToken.sol with the following code.
pragma solidity >=0.7.0 <0.9.0;

import "https://github.com/OpenZeppelin/openzeppelin-contracts/blob/master/contracts/token/ERC20/presets/ERC20PresetMinterPauser.sol";

contract myToken is ERC20PresetMinterPauser {
    constructor() ERC20PresetMinterPauser("myToken", "MYT") {
    }
}
Note that we can import remote contracts directly from Github in Remix but not currently in Truffle which we will be using later. There are two variables passed to the constructor function, the first is a name for the token and the second is a symbol i.e. “Ethereum”, “ETH” or “Bitcoin”, “BTC”
Now let’s select the “Solidity Compiler” tab from the menu on the left and compile the contract. Then select the “Test & Run Transactions” tab and deploy the myToken.sol contract.
Once deployed we can interact with our contract to mint tokens and check balances etc.
Deploying A New Token To Ethereum
For the next step we will need a few tools setup.
- NodeJS – A Javascript runtime
- Git – A code repository management tool
- Truffle – A command line tool for migrating smart contracts
- Infura API Key – Provides access point to Ethereum network (free to use)
- Metamask – A wallet which we will use to manage keys and balances

I’ll be deploying to the Ropsten testnet in this tutorial but the method is exactly the same to deploy to the Ethereum mainnet. When setting up metamask note your mnemonic (also called a secret recovery phrase) which we will be using later, switch the network to Ropsten Testnet then copy and paste your address (public key address starting 0x.., don’t paste the mnemonic anywhere public) into the faucet at https://faucet.ropsten.be/ to get some free testnet ETH.
Once we have some ETH in our wallet we can use this to pay for transaction costs to deploy the contracts.
Now let’s create a new directory called myToken and open up a command prompt within that directory.
We want to initialise a new truffle boilerplate with the command:
truffle initThen we are going to clone the Open Zeppelin smart contracts locally
git clone https://github.com/OpenZeppelin/openzeppelin-contracts.gitFinally we are going to install a wallet management tool used in the Truffle configuration file.
npm install @truffle/hdwallet-providerNow let’s go into the myToken/contracts directory, delete migrations.sol and create a new file called myToken.sol
Copy the code we used earlier with the import line changed to the local directory location of the Open Zeppelin contract.
pragma solidity >=0.7.0 <0.9.0;

import './../openzeppelin-contracts/contracts/token/ERC20/presets/ERC20PresetMinterPauser.sol';

contract myToken is ERC20PresetMinterPauser {
    constructor() ERC20PresetMinterPauser("myToken", "MYT") {
    }
}
Now if we go in to the migrations directory, delete 1_initial_migration.js and create a new file called 1_deploy.js with the following code
const myToken = artifacts.require('myToken');
module.exports = function(deployer) {
    deployer.deploy(myToken);
};
Now let’s edit the myToken/truffle-config.js
We need to uncomment the following lines and enter the infura API key and the mnemonic. Note that the mnemonic provides complete access to your cryptocurrency wallet so this is particularly sensitive. If running on the mainnet consider using an environmental variable or secret file to store this data.
const HDWalletProvider = require('@truffle/hdwallet-provider');
const infuraKey = '23423423424242342342';
const mnemonic = 'hello world these are my secret words';
Then around line 60 in the networks section we want to uncomment ropsten and set up our provider with the infura key and mnemonic
ropsten: {
  provider: () => new HDWalletProvider(mnemonic, `https://ropsten.infura.io/v3/${infuraKey}`),
  network_id: 3,
  gas: 5500000,
  confirmations: 2,
  timeoutBlocks: 200,
  skipDryRun: true
}
Finally we set our compiler to the latest version around line 83
version: "0.8.4",That’s everything setup and we should be ready to deploy the contract.
truffle compile
truffle console --network ropsten
migrate
We should see the contract deployed to the Ropsten testnet and in the output there should be a contract address provided. We can copy and paste this contract address into Ropsten’s Etherscan Explorer. Here’s one I deployed earlier:-
https://ropsten.etherscan.io/address/0x1CAD653E77465bEF6580C8D637DE767E782Fa326
Minting Tokens Using Truffle Console
While we are in the truffle console we can interact with the deployed contract. Let’s first create an instance of it using the command
const instance = await myToken.deployed();Then let’s try minting tokens to an address, so copy and paste the public key address from metamask or the truffle output in to the following command:
instance.mint('0x...','1000000000000000000000');Note that both fields are strings encapsulated in quotes. Also the value is the lowest denomination and by default the contract is set to 18 decimals so this will mint 1000 whole tokens. If we enter our public key address into the Ropsten ethernet explorer we will see these tokens in our account. We can also transfer and check balances from within Truffle.
instance.transfer('0x...','500000000000000000000');
instance.balanceOf('0x...');
To show the tokens in Metamask go to Assets then Add Token then paste the contract address in.
So to summarise we have two addresses:
- A public key address, this is our personal address which we set up on metamask to move funds around and pay for transaction fees. It also has unique ownership rights to the token contract which enables us to mint new tokens and carry out other administrative tasks.
- A contract address where the token is deployed which is used to access the contract functions. You can think of the contract address as the location at which your new token exists on the Ethereum network. It will be used when we setup a liquidity pool.
How To Set Up A Uniswap Liquidity Pool
Setting up a liquidity pool allows users to swap our new token for their existing assets. In this example I’ll be setting up a pool using Ethereum as the base asset however it could be USDT or any other ERC20 compatible asset.
Let’s start by going to https://app.uniswap.org then set the network in the top right corner to Ropsten, then select Pool from the top menu then More > Create a Pool
We then need to paste in our token contract address and set the base asset to ETH.
I’m going to be using the following setup to add initial liquidity

So I’ve set the fee to 0.3% which is standard for tokens. Stablecoins might use 0.05% and 1% is used for “exotic assets” which is just when low liquidity could mean impermanent loss exceeds the fee revenues at lower rates.
I’ve set the initial MYT price to 0.001 ETH, this is completely up to the user deploying the pool.
I’ve also set somewhat of a concentrated liquidity price range limiting the liquidity I am providing to a maximum price of 1 ETH per 1 MYT. There’s a balance to be had here where you want to concentrate liquidity as much as possible but for a new asset if price moves outside of the range it risks becoming illiquid. One solution would be to setup a wide range with half the capital and then set up a second position for a much tighter liquidity range and actively manage that range.
Finally we’ve set the deposit amounts for both tokens. The more capital you can deploy on the base asset side the less price movement there will be when swaps take place. To create the liquidity pool we first Approve Spend of the MYT token and then Add the pool.
Swapping ETH For Our New Token
We can now swap tokens using Uniswap to swap between ETH and our new MYT token.

If a new user goes to Uniswap they’ll need to add the token contract address as the token wont be listed on Uniswap’s named tokens lists. By default Uniswap v3 is so far only including the Gemini list of 28 tokens which is very difficult to get included on. Probably the easiest list to get approval for is the CoinGecko list which includes all tokens listed on the site and can be enabled using the toggle switch. Many users will have this turned on already as well.
You can apply for your token to be listed on CoinGecko here: https://docs.google.com/forms/d/e/1FAIpQLSdW6tbzcnfMNg3KLTCHbigVTjJhXoNU-xeu9Y03PKqiUVRM7A/viewform (Note this is the correct form as of June 2021, check the main website to ensure it’s still the recommended token submission method).
Conclusion & Cost Analysis
This demonstrates how easy it has become to setup a cryptocurrency token and make it tradeable using a leading decentralised exchange.
The main cost involved is with the base asset of the liquidity pool. There’s no exact answer as to how much is a good starting point as it depends on expected trading volumes and how much supply and demand for the new token there will be. As a rough estimate I think five times the expected daily trading volume would be a good place to start but each pool will be different.
The cost of deploying the contracts and setting up the liquidity pool were as follows:
Deployment of the ERC20 Token cost 0.0649833 ETH
Deployment of the liquidity pool cost 0.031548 ETH
This is with gas price set to 20 Gwei. Gas prices on Ethereum mainnet fluctuate widely so check the current rates at https://etherscan.io/gastracker
I hope this tutorial has proved of interest and helps understand how new tokens are created and traded.
