
Solidity is the programming language used to develop smart contracts on Ethereum and other compatible blockchains. In this “Solidity for Beginners” tutorial I will take you from setting up solidity tools to deploying your first contract.

Tools & Setup
We will be starting in Remix which is an online development environment accessible via any web browser.
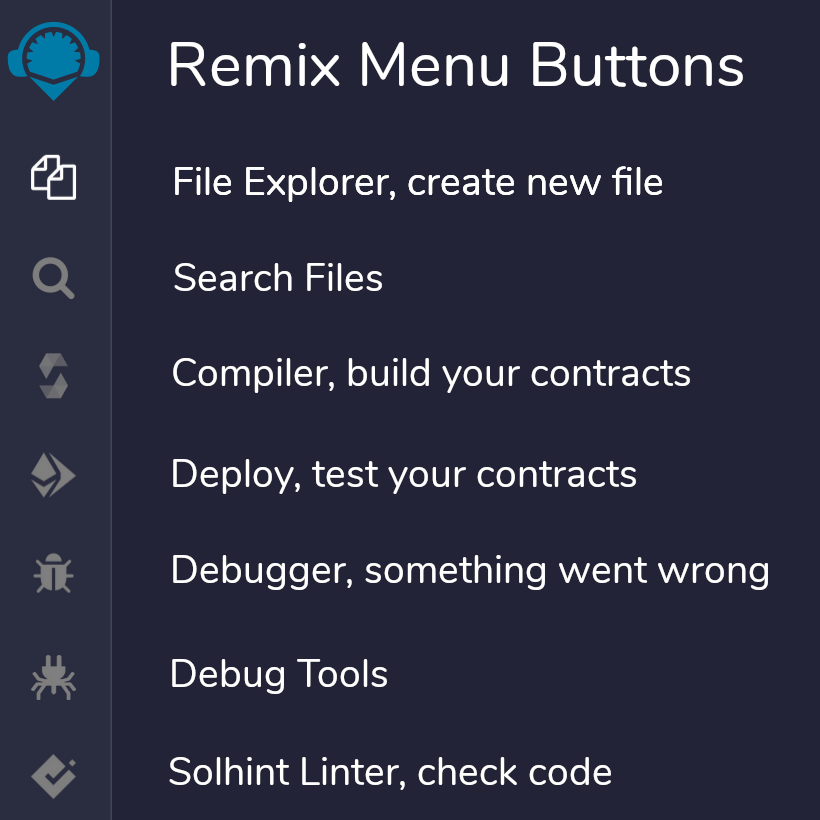
Familiarise yourself with the menu tab on the left side of the screen.
Next to this we have the file explorer where we can open directories and create files. Solidity code is stored in text files with a .sol extension.
Let’s go ahead and create a new file in the contracts directory. Double click the contracts then click this new file icon and call it HelloWorld.sol

Hello World
Let’s copy and paste our first contract into the right panel which will act as our text editor.
// SPDX-License-Identifier: MIT
pragma solidity ^0.8;

contract HelloWorld {
    string public greeting = "Hello World";
    function setGreeting(string calldata _greeting) external {
        greeting = _greeting;
    }
}
Understanding The HelloWorld.sol Contract
There are a few concepts to understand in this first example.
The first line is the open source license, the second line defines we need to use version 0.8 of the solc compiler or higher when we build the contract.
Next we define the contract itself between curly brackets and give it a name matching the filename HelloWorld.
We then define a string, which is programmer talk for a line of text. The variable is declared public so it’s available outside of the contract. In solidity defining a public variable also gives us a getter function so we can receive that data in our application. Finally we give the variable a name “greeting” and a initial value of “Hello World”.
In solidity a transaction/gas fee is paid to write/modify data on-chain but reading it is free of charge.
So to change the greeting string we need to create an external function which accepts a value. This value will be defined as _greeting, note the use of the underscore which is widely used to describe a variable passed to a function. We also need to define where the _greeting variable will be stored, the cheapest is calldata so we use that (other options include storage or memory).
The internals of that setGreeting function simply set the global variable greeting to the value passed in through _greeting.
Compiling, Deploying & Testing
Using the menu buttons on the left go to the compile tab and the hit “Compile HelloWorld.sol” button. This is where you may get errors popping up if there are any bugs or issues. Hopefully that should compile and we can go on to the next “Deploy” Tab.
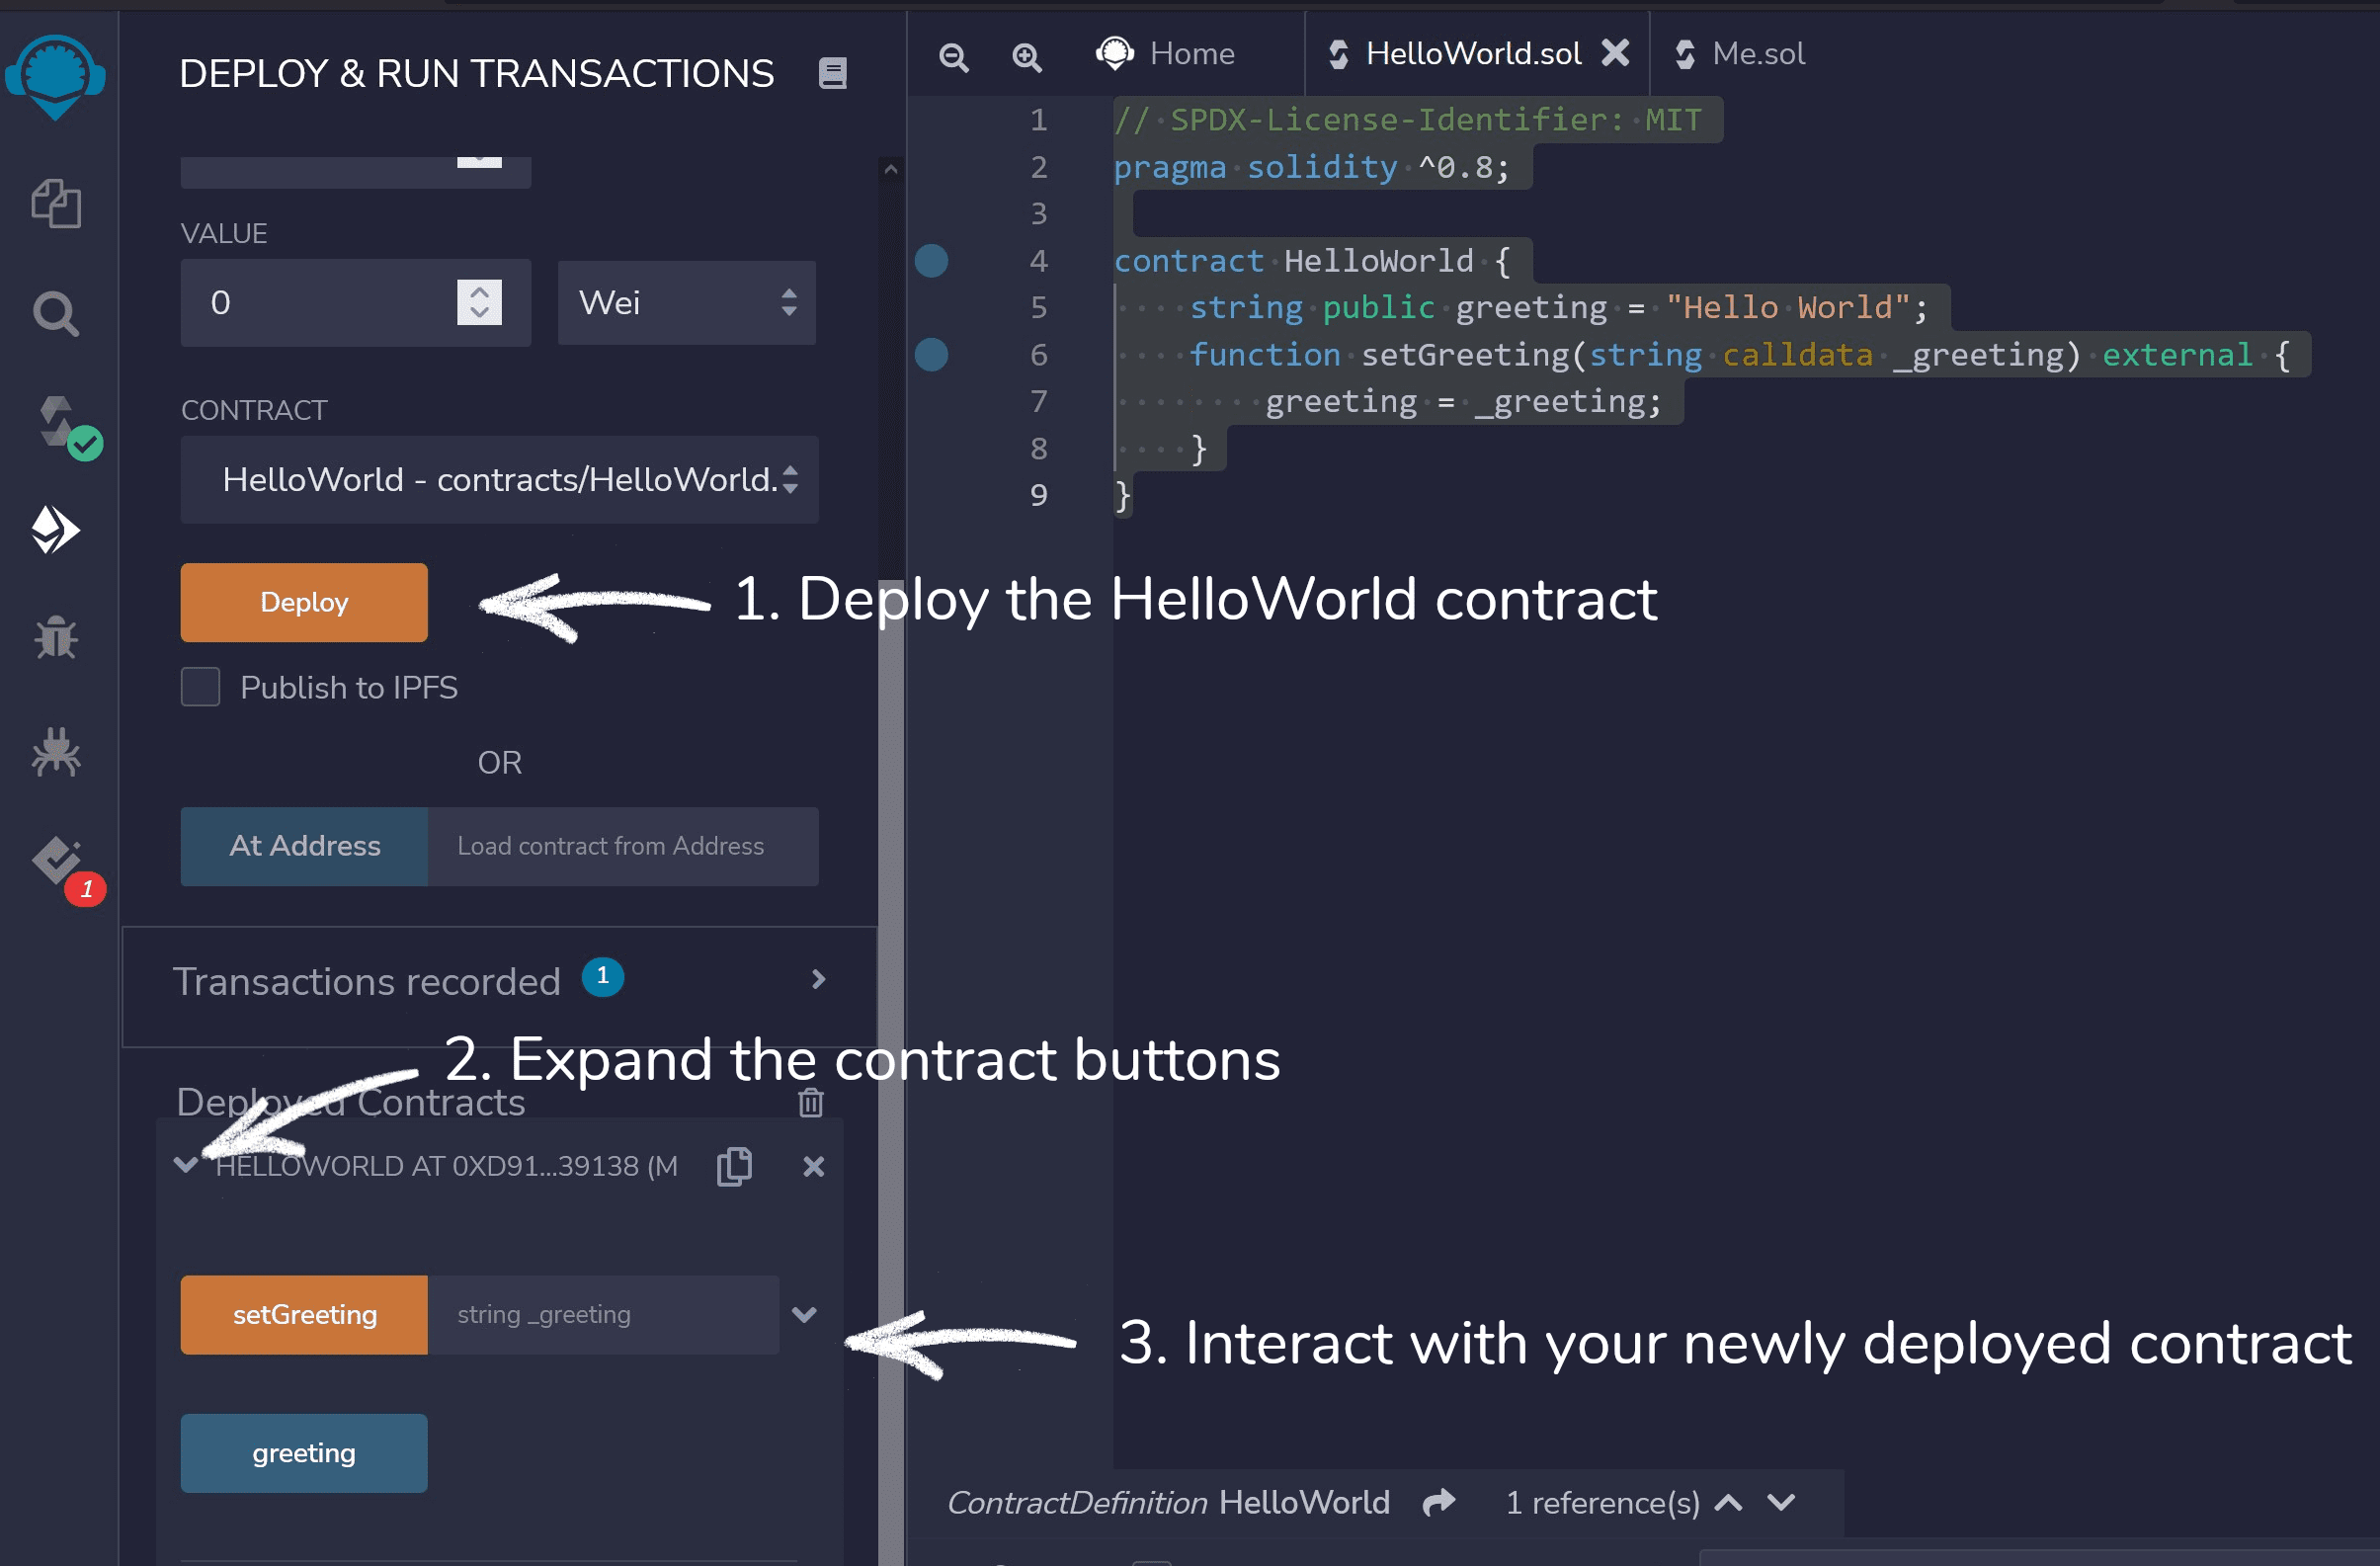
So we click deploy, then expand the contract and use the setGreeting and greeting buttons to interact with our contract.
The contract is only currently deployed to our local machine. We will look at deploying a contract to an external blockchain later on. First let’s go through some more examples of solidity code.
Transfers
Solidity is fantastic for creating smart contracts which handle funds, programmable money. In this example we will create a bank vault to store funds for a single user.
// SPDX-License-Identifier: MIT
pragma solidity ^0.8;

contract Bank {

    address owner;

    constructor() {
        owner = msg.sender;
    }

    receive() external payable {}

    function checkBalance() public view returns (uint256) {
        return address(this).balance;
    }

    function withdraw() public {
        require(msg.sender == owner, "Error - You can not withdraw funds");
        uint256 contractBalance = address(this).balance;
        payable(msg.sender).transfer(contractBalance);
    }
}
We start this contract by defining an owner address which is set to zero value initially. The constructor function will only run once when the contract is deployed and this sets the owner variable to the address that deploys the contract.
Then we have a receive function which permits the contract to receive funds in ETH. The checkBalance function is a public view function which means that it doesn’t alter state but just returns a value, in this case the balance of the contract.
Finally we have a withdraw function which requires the msg.sender (person that sends the transaction) is the owner of the contract. It then checks the balance and transfers it to the sender.
When deploying and testing this contract we can send funds using the following method in Remix:-

Tokens
While the Bank.sol example above uses ETH let’s look at an example of importing a library and using it to build our own token. The token library is called ERC20 which is the standard used for fungible tokens. We will import OpenZeppelin’s version of the standard.
// SPDX-License-Identifier: MIT
pragma solidity ^0.8;

import "@openzeppelin/contracts/token/ERC20/ERC20.sol";

contract MyToken is ERC20 {
    constructor() ERC20("MyToken", "MTKN") {
      _mint(msg.sender, 100 * 1e18);
    }
}
When defining the contract we use the is keyword to indicate it inherits from the ERC20.sol contract. We then create a constructor argument which passes a token name and token symbol through to the constructor function in ERC20.sol.
Finally we mint some tokens for the address that deployed the contract. 100 tokens with 18 decimals.
When deploying this contract in Remix one common mistake is to deploy the inherited contract rather than MyToken. Above the deploy button there is a dropdown box where you need to select the exact contract you wish to deploy.

Lego Bricks
One of the beautiful things about blockchain development is the ability to build on top of existing smart contracts. We can interact with contracts that have been deployed by 3rd parties from within Solidity. Let’s modify the Bank.sol file we made earlier to distribute MyToken’s when someone sends in funds. This will create a Token Sale type of contract where users can purchase MyTokens by sending the contract ETH and the owner can withdraw the ETH.
// SPDX-License-Identifier: MIT
pragma solidity ^0.8;

import "@openzeppelin/contracts/token/ERC20/ERC20.sol";

contract MyToken is ERC20 {
    constructor() ERC20("MyToken", "MTKN") {
      _mint(msg.sender, 100 * 1e18);
    }
}

contract TokenSale {

    address owner;
    MyToken public myToken;

    constructor() {
        owner = msg.sender;
        myToken = new MyToken();
    }

    function buyTokens() external payable {
        require(msg.value > 0, "You need to send ETH with the transaction");
        require(myToken.balanceOf(address(this)) >= msg.value, "Out of tokens");
        myToken.transfer(msg.sender,msg.value);
    }

    function checkBalance() public view returns (uint256) {
        return address(this).balance;
    }

    function withdraw() public {
        require(msg.sender == owner, "Error - You can not withdraw funds");
        uint256 contractBalance = address(this).balance;
        payable(msg.sender).transfer(contractBalance);
    }
}
Most of this code we have seen before. There are two main differences. The first is we are deploying MyToken contract from within the constructor function of TokenSale.sol. This will make the contract the owner of the token and the TokenSale contract will own all the tokens initially.
Secondly we add a external payable function called buyTokens. We require that the user sends ETH with the transaction so they must send funds to the contract. We then check to make sure we have enough tokens in the contract to fulfil the order and we haven’t sold out.
Finally we transfer an equal amount of tokens to the amount of ETH sent to the sender.
While this example uses our own newly minted token there’s no reason why we couldn’t use a 3rd party token or even 3rd party services such as Uniswap or Aave to do interesting things within smart contracts.
Testing
With Remix we are somewhat limited to the amount of testing we can do. To write some unit tests we want a robust framework to abuse and check our code. There are two main options for Solidity developers in 2022 Hardhat or Foundry. Hardhat is a javascript framework which runs on NodeJS it has been about the longest and is the most widely used. Foundry is written in Rust and tests are written in Solidity which makes it a popular choice for people that passionately hate Javascript.
I have tutorials on this blog for both:


I would suggest that Hardhat is a little easier to get started with so we will be using that for these tests. Let’s go ahead and install NodeJS and then use the following commands to install a hardhat repository.
npm install hardhat
npx hardhat init
We can then copy our HelloWorld.sol contract in to the contracts/ directory and edit the test file in tests/sample-test.js
const { expect } = require("chai");
const { ethers } = require("hardhat");

describe("HelloWorld",() => {

  let hw;

  before(async () => {
    [owner,user1] = await ethers.getSigners();
    const HelloWorld = await ethers.getContractFactory("HelloWorld");
    hw = await HelloWorld.deploy();
    await hw.deployed();
  });

  it("Should return the new greeting once it's changed", async () => {
    expect(await hw.greeting()).to.equal("Hello World");
    const setGreetingTx = await hw.setGreeting("Hola, mundo!");
    await setGreetingTx.wait();
    expect(await hw.greeting()).to.equal("Hola, mundo!");
  });
});
This test file starts by importing some libraries, chai is a test framework and hardhat is the solidity framework. We then create a describe function to define our test group.
The before function will run prior to each test. This deploys the contract and sets the contract instance to the global hw variable.
The test is then defined by using it(“description here”, async () => {});
We use expect to check an assertion initially that the greeting function returns ‘Hello World’. Next we update this using the setGreeting function and use .wait() to give the blockchain time to process the transaction and update state.
Finally we check the assertion that the greeting has been changed.
Testing plays a big part in Solidity development and learning to use a framework like Hardhat or Foundry will be necessary for deploying all but the most basic of contracts.
Deploying
We can either deploy our code using Hardhat or Remix. Hardhat is good for more complex deployments where there are multiple contracts. To deploy our contract I am going to keep it simple and use Remix and the goerli testnet. A testnet is a remote network similar to Ethereum mainnet but it is free to use and testnet ETH is worthless. You can get it by googling “Goerli testnet faucet” which you’ll need to do so you have some funds to pay for the deployment.
You’ll also need a wallet, I recommend metamask. Change the network setting on Metamask to Goerli Testnet.

Now if we go back to https://remix.ethereum.org we can deploy our HelloWorld.sol contract to the remote network.
We will go to the deploy tab and select the HelloWorld.sol contract. At the top we also need to set the environment to Injected Web3.

When we click deploy we will be prompted to sign a transaction with Metamask which will deploy the contract to the remote network. We can interact with the contract from Remix in the usual way.
Building a Frontend
While outside the scope of a Solidity tutorial we can copy the deployed contract address from Remix and use the Ethers.js library to interact with our contract. Here’s an example web page which could be used to interact with the smart contract.
<!DOCTYPE html>
<html lang="en">
  <body>
    <button id="connect">CONNECT</button>
    <h1 id="my-greeting"></h1>
    <button id="read">READ</button>
    <hr>
    <input type="text" id="new-greeting" />
    <button id="write">WRITE</button>

    <script src="https://cdn.ethers.io/lib/ethers-5.2.umd.min.js" type="application/javascript"></script>
    <script>
      const provider = new ethers.providers.Web3Provider(window.ethereum,'any');
      let signer;
      let hw;
      const helloWorldAbi = [
        "function greeting() view returns (string)",
        "function setGreeting(string _greeting)",
      ];
      const contractAddress = '0x9163A4201423b96C591C2660EDC126f2180c3508';

      const connect = async () => {
        await provider.send("eth_requestAccounts", []);
        signer = provider.getSigner()
        hw = new ethers.Contract(contractAddress, helloWorldAbi, signer);
        document.getElementById('connect').innerHTML = 'CONNECTED';
      }
      document.getElementById('connect').onclick = connect;

      document.getElementById('read').onclick = async () => {
        if (!hw) await connect();
        const greeting = await hw.greeting();
        document.getElementById('my-greeting').innerHTML = greeting;
      }

      document.getElementById('write').onclick = async () => {
        if (!hw) await connect();
        const newGreeting = document.getElementById('new-greeting').value;
        const tx = await hw.setGreeting(newGreeting);
        const receipt = await tx.wait();
        const greeting = await hw.greeting();
        document.getElementById('my-greeting').innerHTML = greeting;
      }
    </script>
  </body>
</html>
A few things to note here. The ABI is a description of how each function works and we need this for interacting with the contract. We can get an ABI from the compile tab on Remix or just write it out for simple contracts.
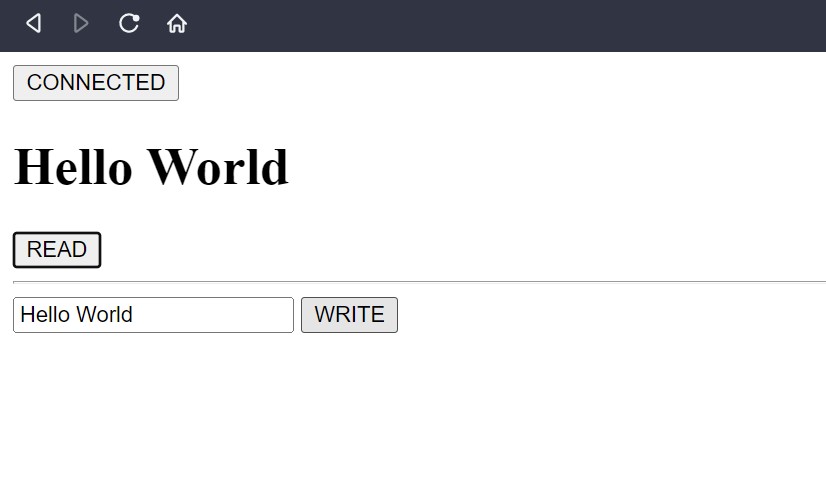
There’s a connect button to connect a wallet before doing any interactions. This will provide access to the RPC node which lives on the blockchain and will pass data to and from the network. Then we have read and write functions to interact with our smart contract and these are linked to the buttons on the web page. While it lacks style and is more Web0.0.3 rather than Web3, here’s what that looks like hosted on a local server:-
The web page could be hosted on a remote or local server and the backend data is stored on a distributed, permissionless peer to peer network. There’s no database or central authority managing that data. This is the beauty of Solidity and blockchain development.
