This article is part of a free online course where you can learn digital marketing.
In this module I’ll be showing you how to create Google Ads effectively to get the best return on ad spend.
- Creating Google Ads Video
- Where Google Displays Ads
- Setting Up Google Ads Campaigns
- PPC Keyword List Tool
- Tracking Conversions
- Optimizing Google Ads
- Google Ads Editor
- 7 Tips For Creating Google Ads
Creating Google Ads Video

Where Google Displays Ads
Google ads is a demand side advertising platform that can includes multiple traffic sources.
First there is the Google search engine where ads can be placed at the top of results. Then there is the display network which consists of 3rd party websites and blogs using Adsense to display banner ads. Google also owns Youtube which is the largest video advertising network. Android is a Google product which means it’s the go to place for app promotion in the Play store. You can also run ads on Gmail, Google discover and other Google owned properties.
This makes Google ads the largest traffic source in the world and knowing your way around the platform is a must for digital marketers.
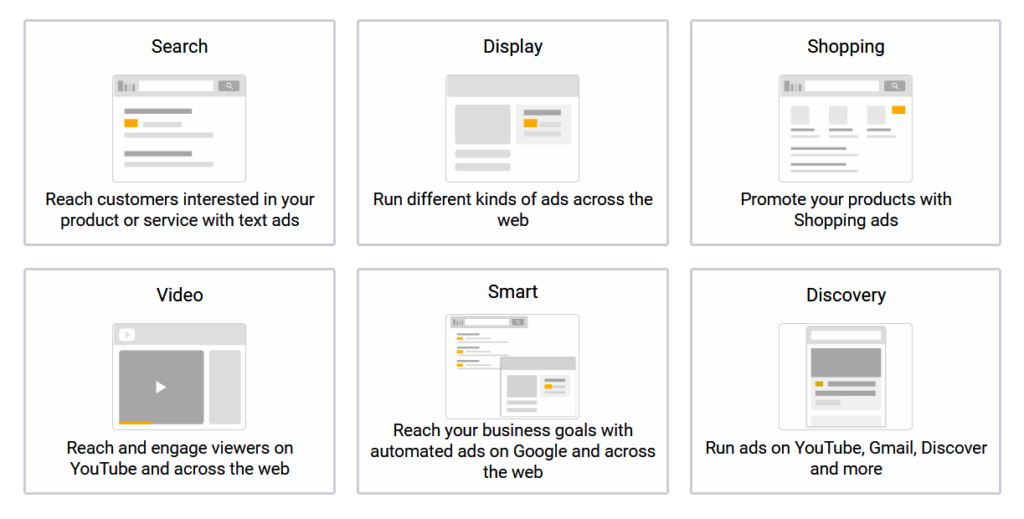
When first setting up a campaign an option is provided to select what type of advertising to run:-
- Google search, text ads also known as PPC (pay per click) ads in search engine results
- Google display network, banner ads on 3rd party websites
- Google shopping ads, listed at the top of search results for consumer items
- Google video ads, displayed on YouTube primarily
- Google smart ads, mixed text/image ads promoted on Google display network
- Google Discovery Ads, mixed text/image ads promoted across YouTube, Gmail & Google discover.
- Google App Ads, promote Android applications on the Google Play store
Setting Up Google Ads Campaigns
There are a 5 steps to creating Google Ads campaigns.
- Define Goals and Traffic Sources
- Select Campaign Settings
- Set Up Ad Groups
- Creating Google Search Ads
- Creating Google Display Ads
- Creating Google Video Ads
- Review Ad Campaign
Define Goals and Traffic Sources
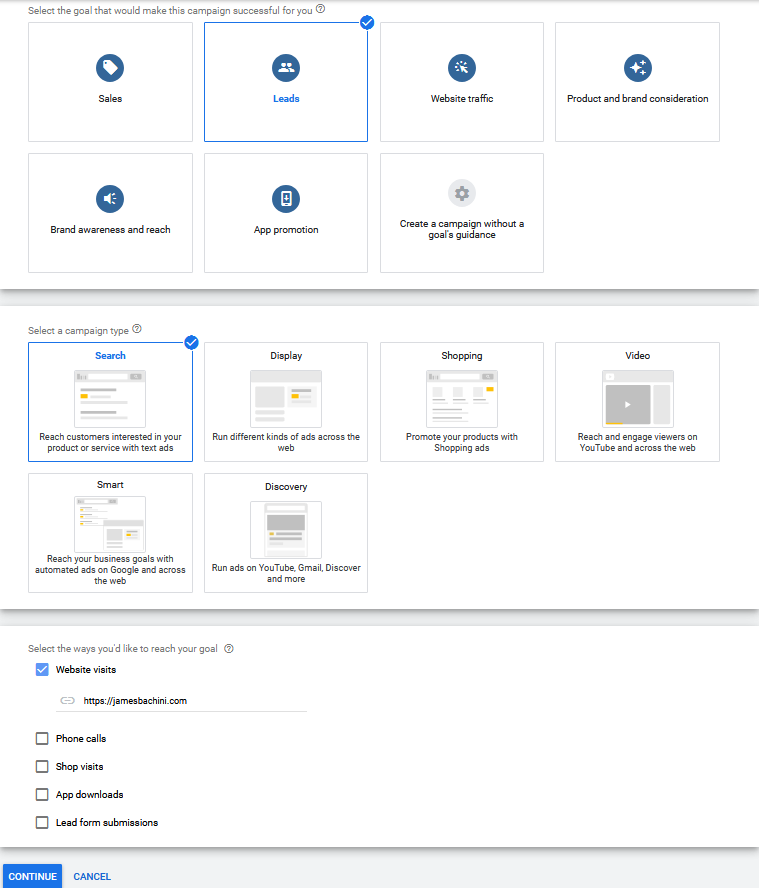
In this first section we will outline our goal. This should be based on the conversion tracking setup for the campaign. If no conversion data is available then set the goal as website traffic.
In this example we will setup a search campaign optimizing based on lead conversion data.
Select Campaign Settings
In campaign settings the first thing to do is unselect the boxes to advertise on search partners and the display network.

We definitely do want to “miss the opportunity” as we want our ads to show up at the top of the listings in Google’s search results.
Leaving this default option ticked would result in a large amount of fraudulent traffic and accidental clicks from our text ads being displayed in 3rd party mobile apps.
Never trust the default settings when creating Google Ads campaigns. Google’s platform is optimized to sell the most inventory for the highest price, not give advertisers the best ad campaign performance.
The next step is to set accurate location targeting.
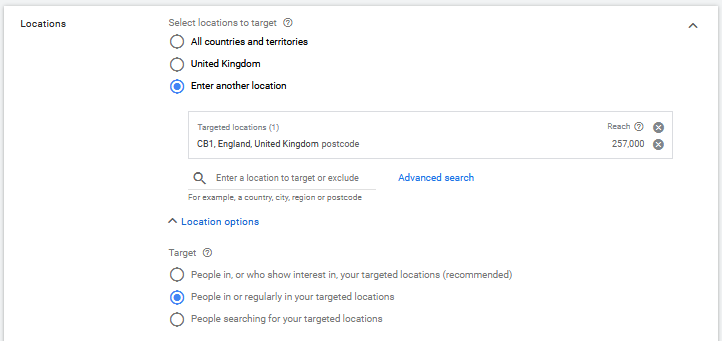
Here I’ve set an exact location by postcode (UK equivalent of a zip code). Then expand the hidden “Location Options” and select “People in or regularly in targeted locations”. This will prevent, as much as possible, getting traffic from outside the targeted area.
The next step is to explore the audience options.
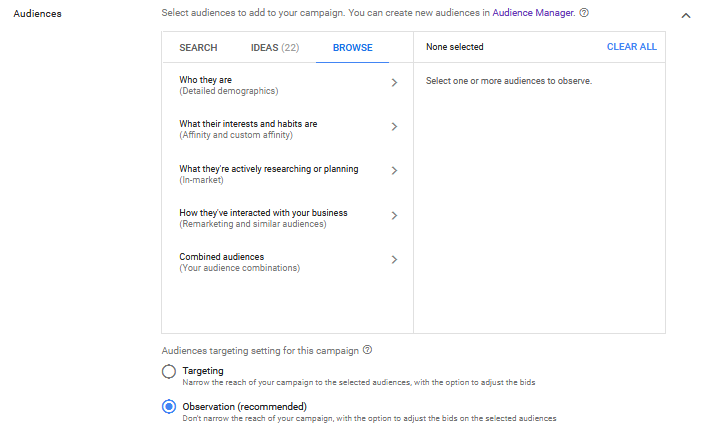
Audiences can be broken down in to four groups
Demographic audiences can be segmented based on parental status, marital status, home ownership and education.
Affinity audiences provide broad interest based targeting for topics such as social media enthusiasts, business travelers and my favorite foodies.
In Market audiences provide more specific targeting based on search intent. This could be based on recent previous searches or interactions with Google products. This can be used to target someone interested in “domain registration” for example.
Remarketing audiences are very powerful. It enables marketers to advertise to previous visitors of their website. Remarketing audiences can be setup in “Tools > shared library > audience manager”.
Combined audiences do exactly what the name says and combine different audiences.
At the bottom is a option for “Audience targeting setting for this campaign”.
- Observation is set as the recommended default option and wont actually do anything initially 🤦 It provides data based on audience settings which can later be optimized by bid adjustments.
- Targeting creates a whitelist of the selected audience and blocks everything else. This can narrow reach and volumes significantly but can provide very effective campaigns.
Next thing to setup is the campaign budget and bidding strategy.
Here we are going to use a £20/day limit for the entire campaign to keep it restricted initially until we see some performance data. Then a portfolio bidding strategy is going to be used to optimize based on ROAS (return on ad spend).
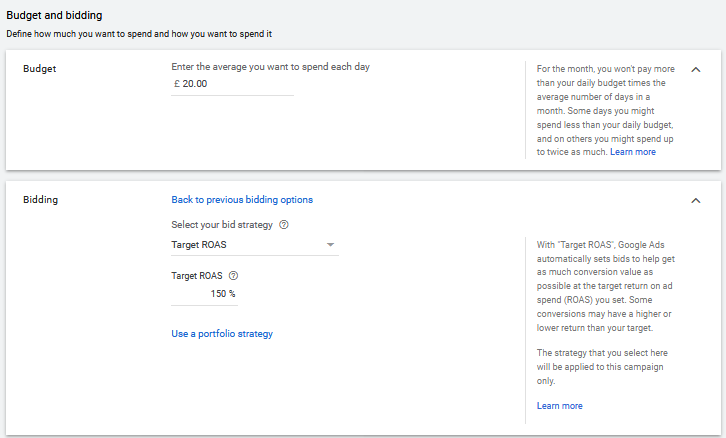
This will do automation behind the scenes to try and hit that target ROAS. I have mixed feelings about this. As we’ve seen Google does not work in advertisers best interests a lot of the time in regards to campaign performance. There’s no reason to believe their behind the scenes strategy algorithms are designed any differently.
Having said that portfolio bidding strategies like this do work well and open up campaign optimization strategies with internal data that wouldn’t be available otherwise.
The final step in campaign setup is to create ad extensions. These aren’t essential but are highly recommended as they expand the ad space and increase click through rate of the ads improving quality scores and overall campaign performance.
Many different types of ad extensions are available and I’d recommend setting up all that are relevant to your business or campaign.
- Sitelink extensions – Adds additional links to your ad
- Callout extensions – Adds more business information to your ad
- Call extensions – Adds a phone number to your ad
- Structured snippet extensions – Adds snippets of text to your ad
- App extensions – Adds an app extension to your ad
- Lead form extension – Adds a form to your ad
- Message extensions – Adds text messaging to your ad
- Promotion extensions – Adds a promotion to your ad
- Price extensions – Adds prices to your ad
- Location extension – Adds a location to your ad
Set Up Ad Groups
Ad groups are used to break a campaign down into more targeted keyword groups and ads.
Each ad group should contain a small group of keywords with the exact same search intent and ads specifically created to meet that search intent.
By breaking the campaign down into many smaller ad groups we can create more relevant ads which get higher quality scores and improve performance. Poor performing ad groups can be paused to focus on the best search intents across the campaign.
Keyword Modifiers
When entering keywords there are a number of options that adjust how Google targets that keyword.
keyword example – broad match, should only really be used for research campaigns to get keyword ideas or narrow targeting later.
“keyword example” – phrase match, more targeted and based on semantic search intent.
[keyword example] – exact match, will only show if someone types that exact phrase into Google. This is useful for high volume keywords which we want to separate into a dedicated ad group. Also when we want the best traffic quality with less consideration over traffic volumes.
+keyword +example – pro match, (aka specific broad or plus modifier) this is like a secret option that Google doesn’t advertise. If someone searches any phrase with both keywords the ad will show. I use this 80% of the time to balance traffic quality and volume.
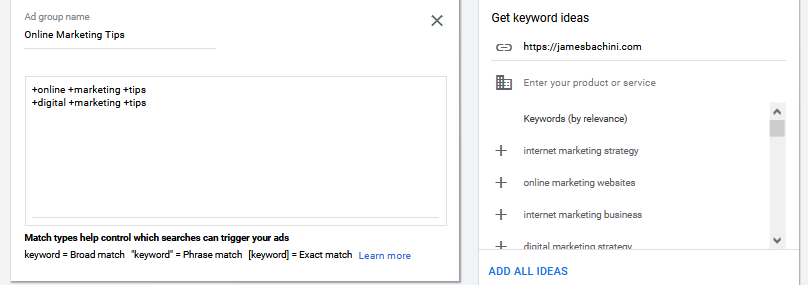
In the example above we would create an ad in the next stage with a headline like “8 Online Marketing Tips” this would be a direct answer to the search query and provide a high click through rate and good performance.
A separate ad group might be setup to target “Online Marketing Ideas” which has a slightly different search intent which may convert differently.
Try the keyword tool to create combined lists of keywords where synonyms are rotated.
Create Google Ads
Each ad group should contain 2+ ads specific to the search intent of the visitor. Ads are created differently for search, display and video campaigns which can be broken down as follows.
Creating Google Search Ads
Search ads are text based and can be created either as a standard text ad or a responsive search ad. When creating responsive search ads a large number of titles and descriptions are provided which Google will multivariate test to find the best combination.
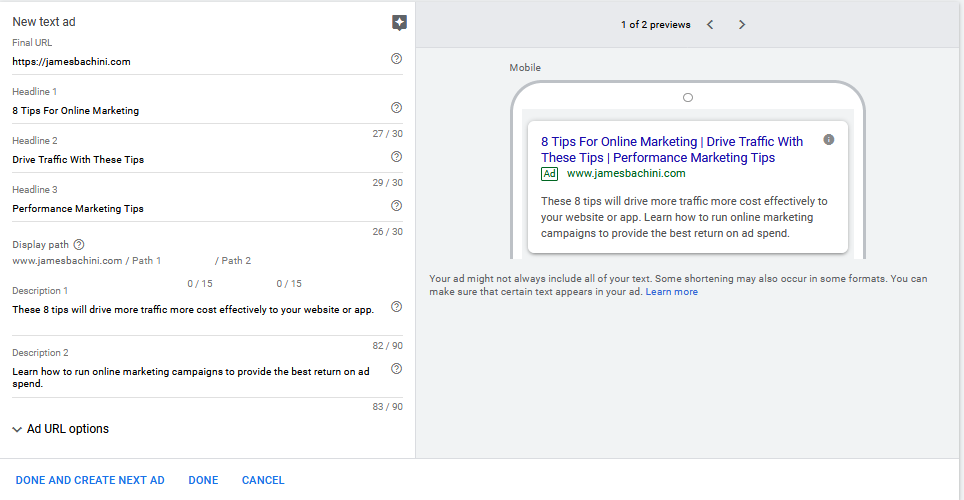
Dynamic Keyword Insertion
We can insert dynamic keywords into the the headline to display the exact search phrase.
If a user types into Google “online marketing tips” we can use the following tokens to dynamically insert the correct capitalization.
| Tag | Displayed |
|---|---|
| {keyword: marketing tips} | online marketing tips |
| {Keyword: marketing tips} | Online marketing Tips |
| {KeyWord: marketing tips} | Online Marketing Tips |
| {KEYWORD: marketing tips} | ONLINE MARKETING TIPS |
We can also add dynamic tracking variables to the URL to pass data to our landing page. For example https://jamesbachini.com/?kw={keyword} would pass the keyword through which could be used as a title on the page.
When creating text ads high click through rate headlines should be used where possible to get the best quality scores.
To create ad variations we can copy and paste an existing ad into the same ad group. This creates a duplicate which can then be edited to create the variation to A/B test.
Creating Google Display Ads
Google display ads perform very differently between websites and apps with app traffic being lower quality generally. For the best quality we can select the websites or apps specifically where the ads should be shown.
Alternatively if running broad campaigns make sure to block all app categories plus a blacklist of websites like the one below.
FREE RESOURCE – Google Display Blacklist
I recommend adding the following 1000+ websites to the exclusion list from the start and then aggressively optimize and build your own blacklist to reuse in other campaigns.
https://jamesbachini.com/resources/GoogleAdsDisplayBlacklist.txt
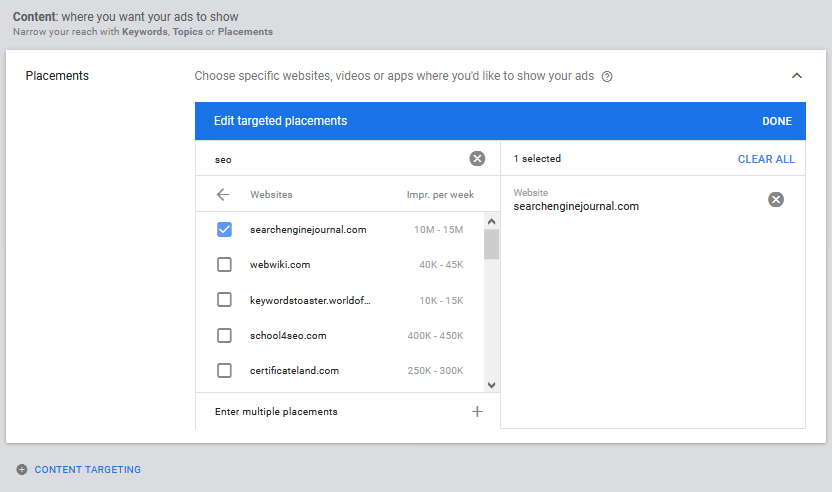
When creating display ads start with the expanded targeting turned off to give more accurate campaign targeting.

We can also add a custom intent audience to the targeting options which can include URL’s and keywords. The keyword tool is useful for creating large keyword lists for custom intent audiences.

If a user Googles “search engine optimization” and visits a blog with banner ads then the algorithm recognizes this previous search intent and ads are shown on the blog.
Dynamic display ads combine images, video and text for Google to optimize across their display inventory.
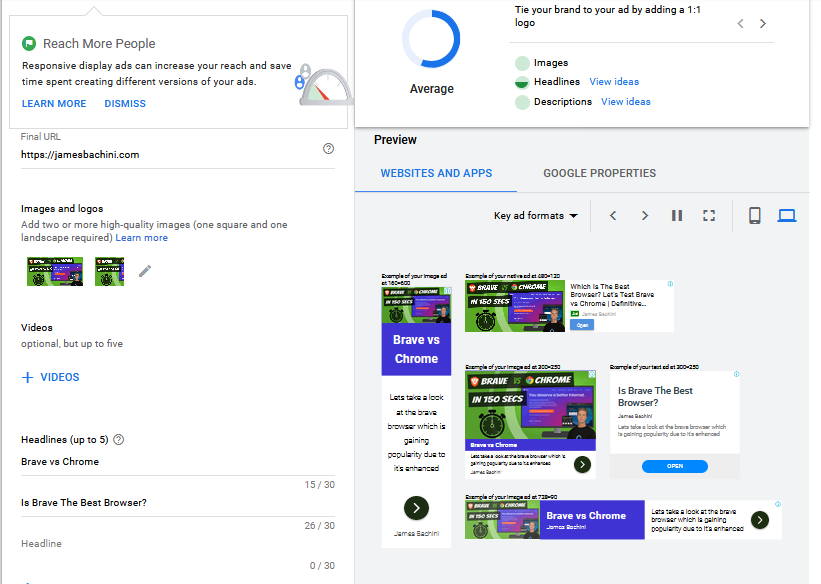
Video ads tend to perform well and Google will actually create animated banners from the images and text provided unless this option is deselected in the “Additional format options”

There is also an option to upload standard banner ads which provides more control over what is being displayed.
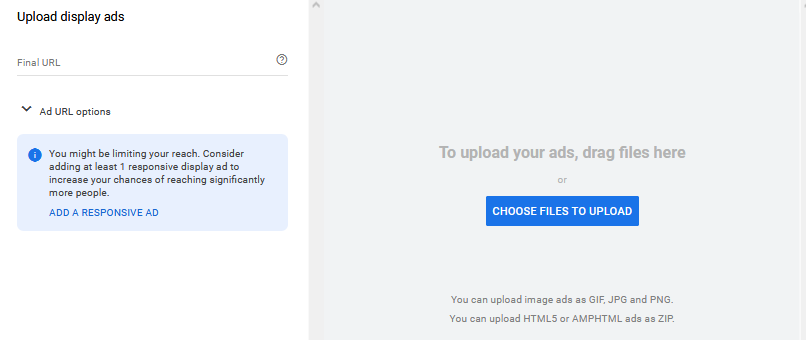
Image ads can be up to 150kb in size and formatted as .gif, .jpg or .png
HTML5 or AMP HTML ads can also be uploaded as zip files.
Setting a frequency cap means that ads are only shown a maximum amount of times to each user. I like to set this to 1/24 which means one impression every 24 hours per campaign initially. Most other marketers suggest 3/24 which is 3 impressions.
Creating Google Video Ads
When setting up video campaigns targeting Youtube traffic there are options to opt out of embedded and live stream videos which improves performance.
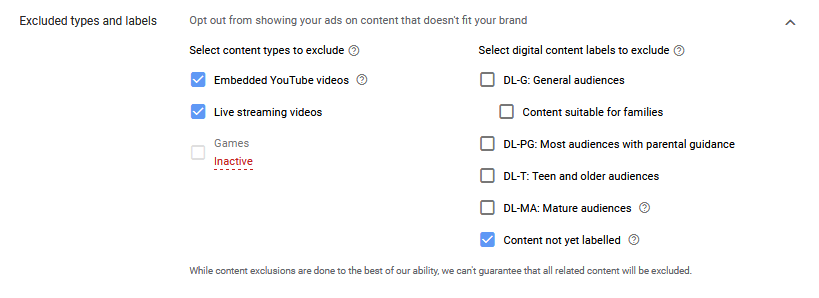
We can then go on to target specific Youtube channels related to our niche.
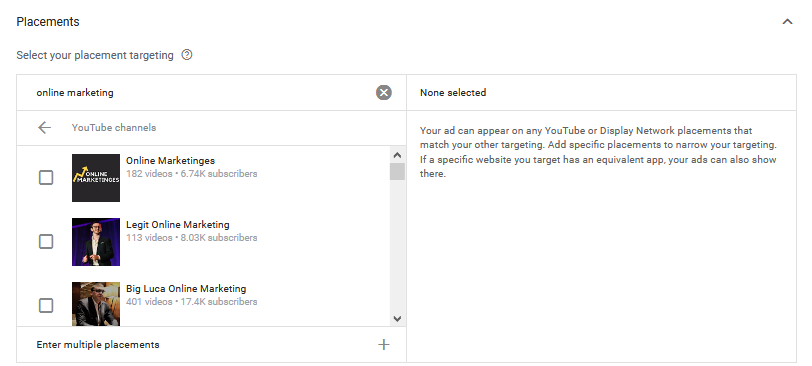
Custom intent audiences can be used for YouTube as well however only keyword list based audiences work and Google recommends 50 keywords per list for targeting video traffic.
There are different forms of video ads. Discovery ads and skipable in-stream ads are the most common.
Discovery ads are shown in the “up next” and search result listings.
Skipable in-stream videos are disruptive ads that play either before on during other YouTube video content. Skipable ads are only shown on channels that have over 1000 subscribers and have opted in to monetize the channel with ads.
The next step is to choose an existing YouTube video to promote by copying and pasting a YouTube link. Note that the FinalURL is on our website (for retargeting purposes) but includes the landing page includes the embedded video.
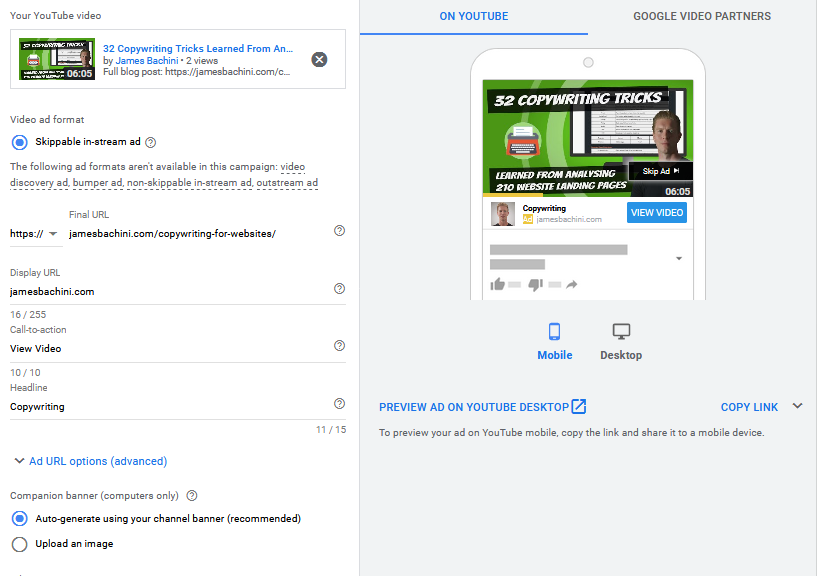
The thumbnail is critical for video ads. Text and shocking/surprised images work well. Look at viral YouTube channels for inspiration.
Video content should get to the point quickly especially for skipable in-stream video ads which can be skipped after the first five seconds. Common copywriting frameworks such as PAPA work well creating short video ads.
A significant percentage of users will have sound turned off during the ad so visually appealing content is essential.
Review Ad Campaign
The final step is to review the campaign and set it to go live.
Once published there are some additional optimizations that may be useful to carry out immediately. Two that are particularly worth looking at are:-
- Bid adjustments by device
- Demographic bid adjustments by age/gender/income
These can be used to narrow down campaign targeting and give the campaign the best chance of success.
PPC Keyword List Tool
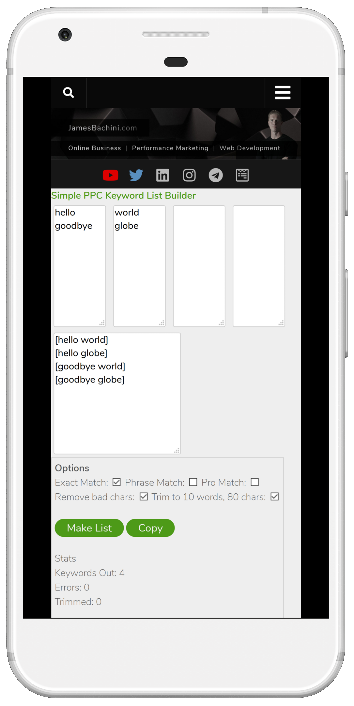
The Keyword List Builder Tool is free to use and makes it quick and easy to generate keyword lists combining up to four keywords in to lists.
This is useful if you want to create synonyms in your searches such as:-
best niche product
top niche product
leading niche product
This can be used alongside the Google keyword planner to get estimated search volumes for the targeted keywords.
Tracking Conversions
To run effective Google ads we need to be tracking conversion data, ideally in the platform itself.

Once on the conversion page a new conversion pixel can be added by clicking the + sign.
We then have four options to setup a conversion pixel on a website, app, phone calls, or import via Google analytics/Salesforce etc.
In this example we’ll setup a website conversion.
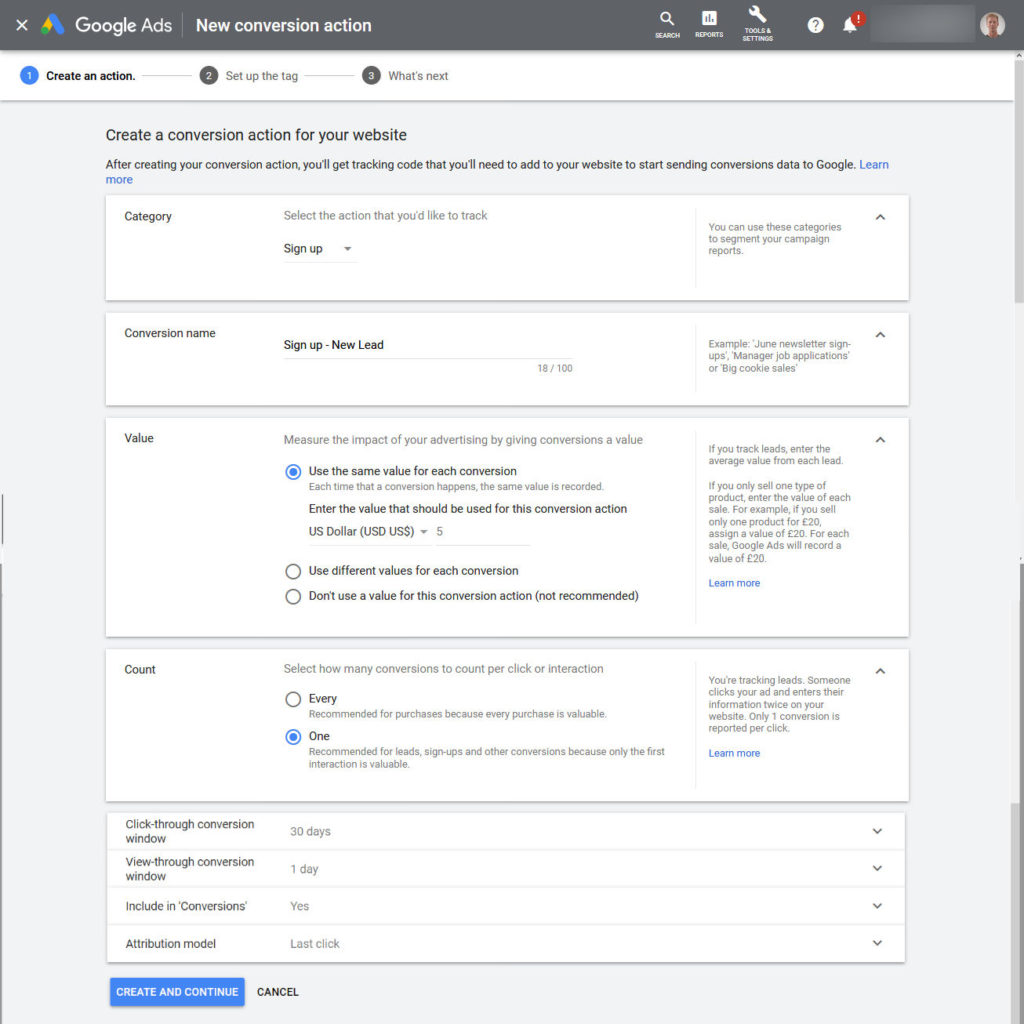
Here we create a sign up conversion for a new lead. Give it a name and set a value of $5 per lead for each conversion. We set it to only convert once per user and then leave everything else as default.
Click “Create and continue” and copy and paste the code on to the thank you for signing up page of your website.
If you have the global site tag already installed for analytics and retargeting then you can just fire a gtag event like this:
gtag('event', 'conversion', {
  'send_to': 'AW-12345678/abcdeFGHIJK_LM',
  'transaction_id': ''
});
Smart Goals
Smart goals can be setup in Google analytics and then imported in to Google ads as conversion data.
Smart goals work well on sites that aren’t performance optimized. They track user interaction with the page such as scrolling, clicking links etc. The goal will fire for the most engaged visitors.
If you have Google analytics setup then there’s not much else to do. Simply go into Google Analytics and select:
Admin > Goals > New Goal > Smart Goal
Give your smart goal a name and click save.
Then go back into Google Ads and use the import tool at:
Tools & Settings > Measurement > Conversions > + > Import
And link the Google analytics data to the Google Ads account.
At least 500 visitors will be required before the goals start firing to establish a baseline for conversions.
Optimizing Google Ads
Once created, Google Ad campaigns should be optimized regularly when there is enough data to show results.
A campaign that is spending $5/day might only need optimizing on a monthly basis whereas high volume campaigns will need optimizing at least weekly for best performance.
Negative Keywords
One of the key optimizations for Google Search campaigns is building a negative keyword list. To do this go into the Keywords section then click “Search Terms”. This will provide the exact keywords that are being typed into google which may differ from broad keywords that are being bid on.
Use this list to blacklist certain keywords which aren’t converting or bringing in irrelevant traffic. The following terms are examples from a negative keyword list in Google Ads which are used to block “non-paying” customers.
free, open source, torrent, pirate, sample, cheap, discount, voucher, homemade, freeware, shareware, used, vintage, antique

Notice in the example above that the exact match keyword modifier is used.
Optimizing Ads
Google likes to auto-optimize ads based on performance. I personally prefer to change this setting to distribute traffic evenly and manually optimize unless the campaign is very small.
Manually optimizing ads gives more control to the marketer who’s interests may not be aligned with Googles.
Responsive search ads are an exception to this rule which I use a lot. These ads are like multivariate tested text ads.

Conversion tracking is essential for optimizing ads. It’s much quicker to optimize based on click through rate but the most favorable ads should not harm the overall conversion rate of the offer.
This is something I’ve seen a lot in banner advertising where the highest CTR ads often don’t perform as well as middle ground CTR ads when it comes to conversions. For whatever reason the ad is over-optimized or promises too much which gets clicks but not conversions.
If using automated bidding strategies and good conversion tracking a lot of the optimization process is taken care of by Googles algorithms. The campaigns should still be checked from time to time and new creatives produced to continuously improve alongside the algorithms optimizations.
New creatives can be generated quickly by copying and pasting the ad into the existing ad group. This duplicate can then be edited for create a variation which will be rotated in to the campaign once approved.
Reporting & Analytics Inside Google Ads
The standard column layouts inside Google Ads provides most of the most important data fields. There is however a huge amount of data outside of this which is accessible by clicking the “Columns” button on the right above the tables.
From here we can add different columns from the options below. I’ve ticked the ones that I have found most useful in the past.

Location, Ad Schedule & Devices
These tabs provide great opportunities to fine tune a campaign and improve return on ad spend.
In the example below we can see that Computers are converting a lot better than tablets or mobile so we’ve done a bid adjustment to increase bids by 50% for desktop computers.

Beware of standard deviation (luck) as the data above isn’t really enough on it’s own to make those decisions. We only have 7 conversions for desktop computers which could be a coincidence and more data would be required to be confident about the optimization.
Ad schedule tab provides day parting which allows us to run ads at certain times of the day and days of the week. For retail and service industries this might work well to advertise when stores are open. Other offers like gaming and dating might work better on Friday and Saturday nights. Bid adjustments can be made to increase volumes during these times.
Google Ads Editor
Google Ads Editor is a free tool provided by Google as part of their advanced campaign tools.
You can download it here: https://ads.google.com/intl/en_uk/home/tools/ads-editor/
Connect your account and download campaigns.
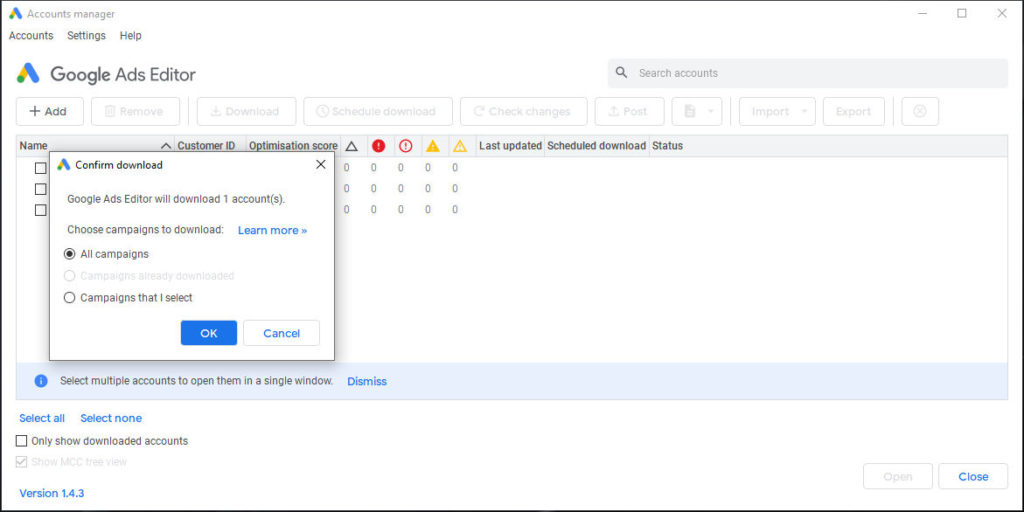
It can then be used online and offline to create and edit campaigns in Google Ads.
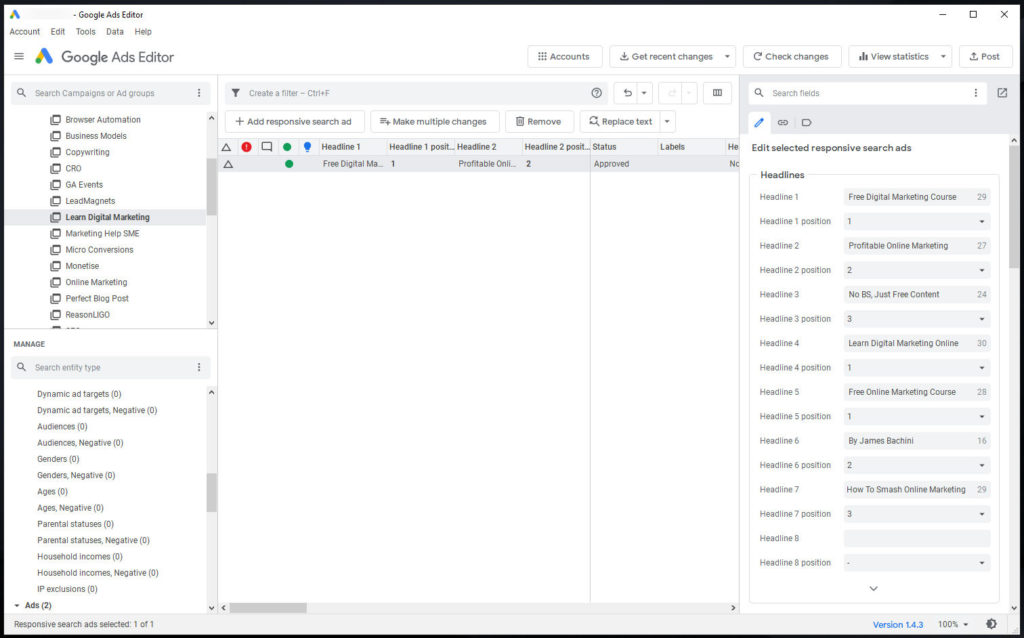
It’s a powerful tool which is more laid out for advanced users and marketers who already know their way around the main Google Ads platform.
The structure and workflow in Google Ads Editor makes it faster and more efficient when dealing with large campaigns. Things like copying and pasting ads across ad groups is instant.
Note that changes need to be “posted” once finished to upload them to the system. Everything is edited and stored offline before changes are sent across to the platform.
7 Tips For Creating Google Ads
- Google ads is a platform for Search, Display and Video ads. These all perform differently and campaigns should be separated between the networks. Always untick “include display network” traffic when setting up search campaigns for example.
- Don’t assume the default options when setting up a campaign are optimal. Googles interests are not aligned with your own. Their algorithms and platform are optimized to sell the most inventory and generate the most revenue for Google not provide the best performance for advertisers campaigns.
- Sitelinks and other extensions can improve click through rate, quality score and the performance of the ad campaigns overall.
- Track conversions in Google Ads. Either setup the code on site or import conversions from goals and smart goals in Google Analytics. This will provide data to both manually optimize and for Google’s algorithms to optimize with. Portfolio bidding strategies can be used to automate much of the process.
- When running display ads mobile app traffic is generally low quality. Target specific websites using content placements to ensue ads are only shown on approved sites. Custom intent audiences can also be used to target specific URL’s and keywords.
- Copy and paste ads to create duplicates in the same ad group then go in and edit the headlines to create variations to split test. Once enough data is available to make meaningful conclusions pause poor performing ads and create variations on the top performing ads. Don’t be afraid to try completely new angles and ideas either.
- Use the search terms report to see what is actually being entered into the search engine. This data can be used to optimize campaigns by creating negative keyword lists to block.
This article is part of a free online course where you can learn digital marketing.
If you’ve enjoyed these resources could you help share this content on social media and send it to anyone who you think might benefit from it.
Thank you.


